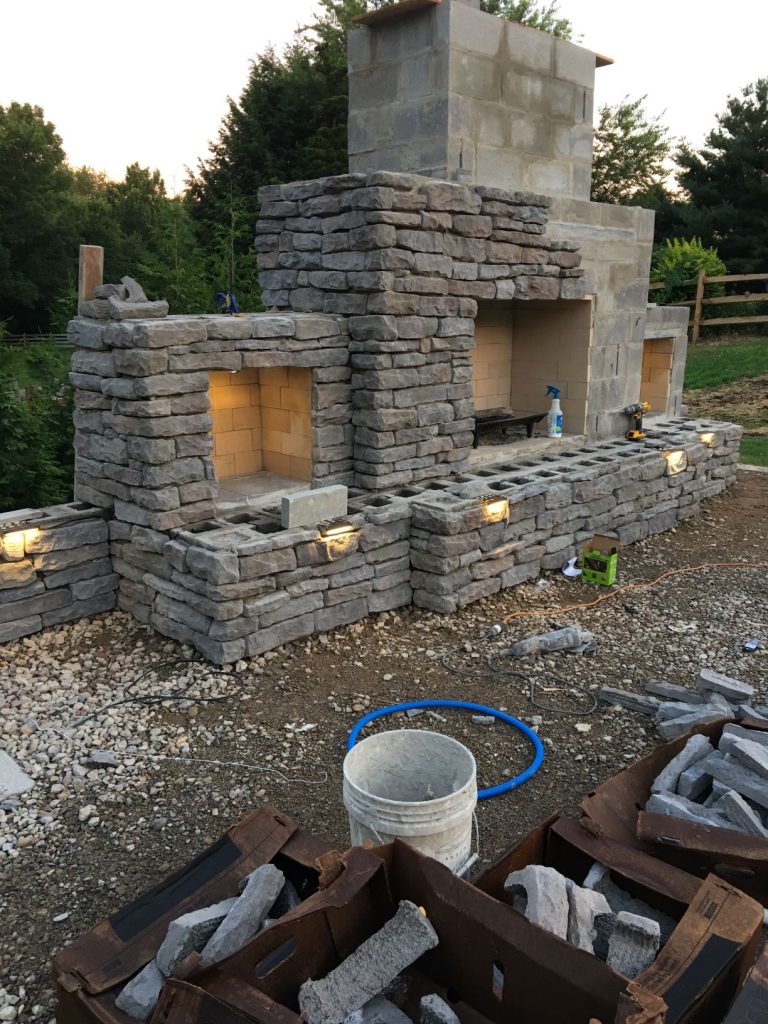
Holy cow, it’s been a while since I have written on the blog and I am feeling like there is so much to say. As always, we are so humbled by what we see our amazing DIY customers building using our DIY construction plans. We love the pictures we are constantly receiving.
We have so many that we want to show off and we know that you will find some inspiration from them. We are amazed constantly that even though most of our customers have little to no masonry experience, that they can build these awesome DIY projects.
We, like so many others, have social media accounts that allow us to show off and brag about our very talented customers. It is very important to understand that the pictures we post are of DIY outdoor fireplaces built using Backyard Flare DIY construction plans. These builders are also everyday homeowners who want to save thousands of dollars and build it themselves.
Check Us Out – DIY
Our Instagram page is updated frequently and we know you’ll get lots from it. Our Pinterest page is a great resource for additional photos and information. Please check us out and please like and subscribe to these sites. You’ll be notified when we post more great info and pics. Who knows, we could even post a picture of your fireplace for the world to see.
We know that we can provide the knowledge and we’ll be the cheerleader for you to be successful in your DIY fireplace project. Let us know if you have any questions and we will do our best to get you an answer. Thanks and as I always say…”HAPPY BUILDING”. -Dan
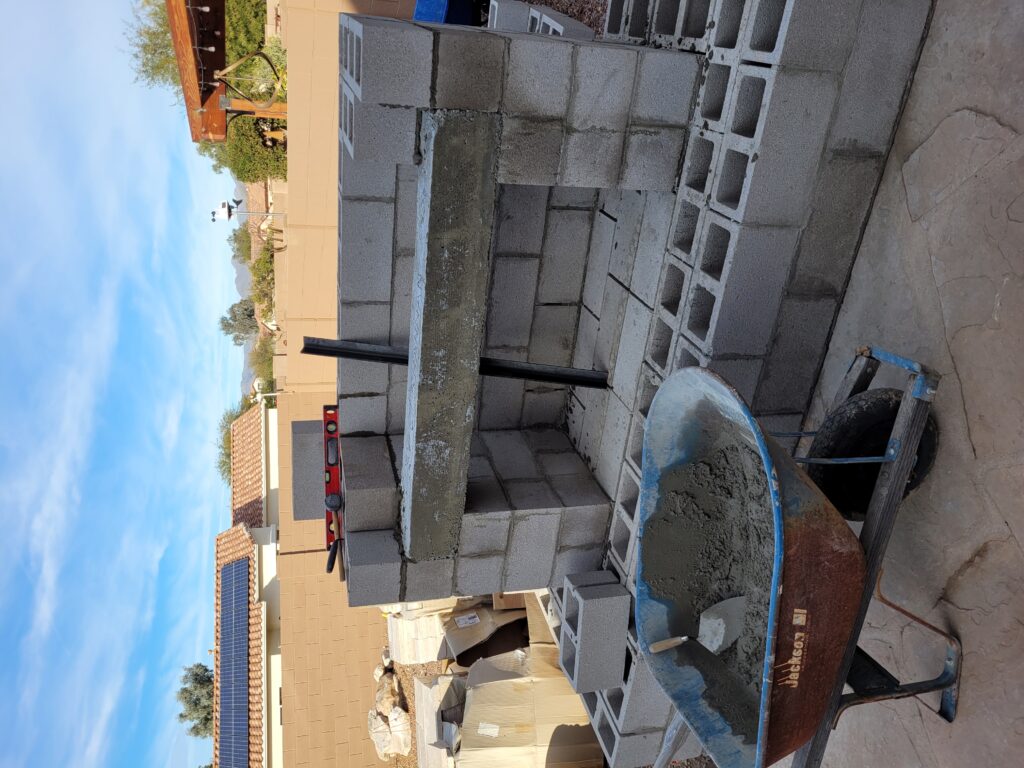
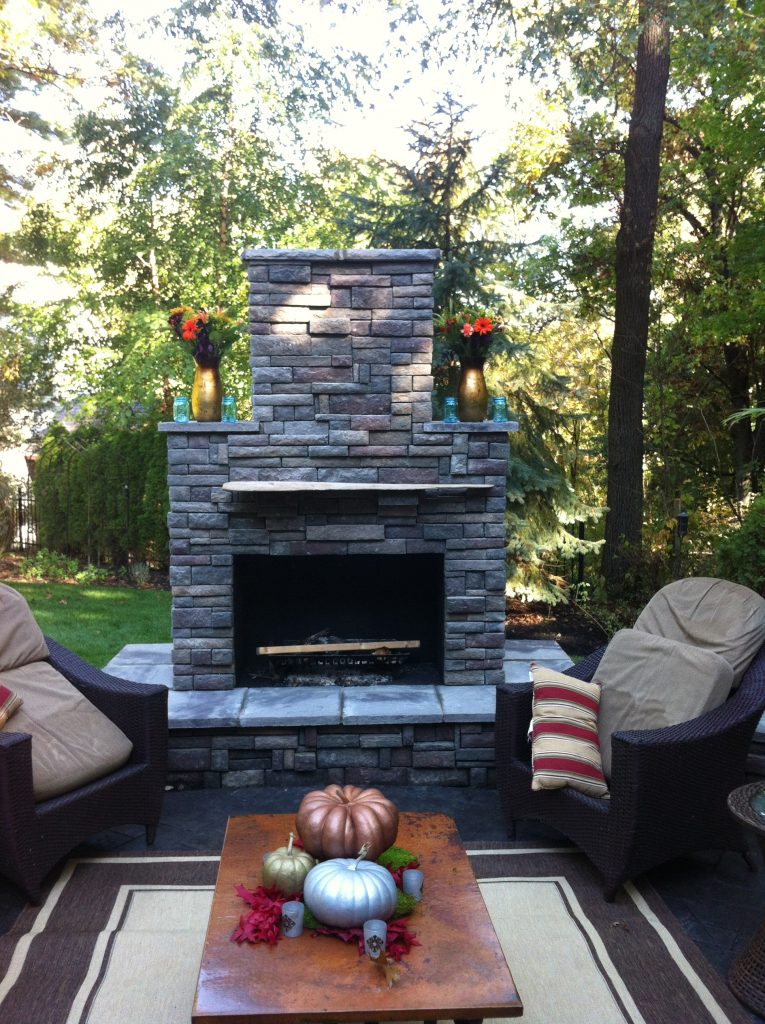
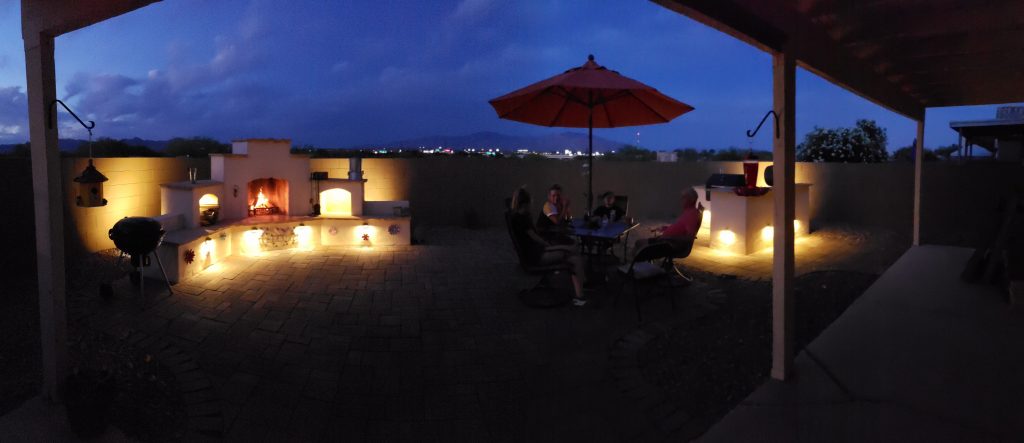
When you see an outdoor fireplace in a backyard, don’t you think relaxation and a hangout destination? We sure do, and we love to see our DIY customers using and enjoying the outdoor fireplaces they build. It’s so fun to light that raging fire and sit back with a beverage and blanket. Kick your feet up on the hearth, listen to the crackle and pop, and follow the dancing flames.
There are a few items that we think every outdoor fireplace owner should invest in, because they make the experience more enjoyable, and frankly, more manageable. Now that may seem a bit broad, so let’s get right down to it. Here are three things that you should buy and why.
#1 – Fire Grate
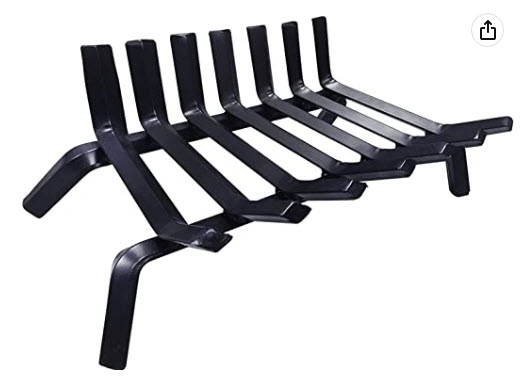
When you attempt to light a fire, you need oxygen as one of the three components. In order to get oxygen below the wood that you’re burning, it is necessary to elevate the wood just a few inches and contain it. This is the job of a fire grate. These wrought iron metal grates are super resilient and they will last you for years. Let us introduce the Amagabeli fire grate, available in 21″, 24″, and 30″ widths. One will fit into any size firebox you have, and it looks great too.
Amagabeli fire grate available in 21″, 24″, or 30″ widths
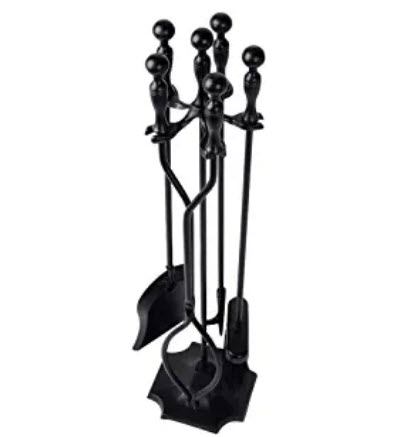
#2 – Fireplace Tools Set
Now that you used the grate to contain the raging fire, you will need a set of useful tools to manage the fire. These tool sets almost always have pokers, tongs, and even little shovels and brooms for the ash. Many of the sets come with a decorative rack to store the tools and they look super nice on the seating surface of the structure. Look no further than the Amagabeli 5 piece wrought iron set that will last a lifetime.
Amagabeli 5 piece set
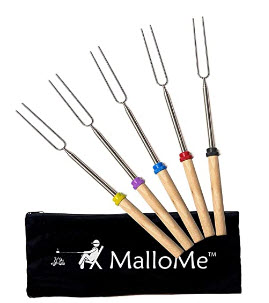
#3 – Marshmallow Sticks
Oh yeah, nothing says fun over a fire more than roasting marshmallows. Then do you sandwich it between graham crackers with chocolate? Sure you do. But it’s always better to extend that marshmallow over the fire with a telescoping and reusable stick. We use the stainless steel MalloMe sticks that telescope to 32″, so you and your kids can stay a good distance from the fire. They are color coded so each person can have their own dedicated stick. Never a more fun way of enjoying a backyard fire.
Extendable to 32″
So there you have it, our three great picks and must haves for your DIY outdoor fireplace. Make your fire experience a great one. And as always, go to Backyard Flare, LLC for all your DIY construction plans and useful info for building your masterpiece.
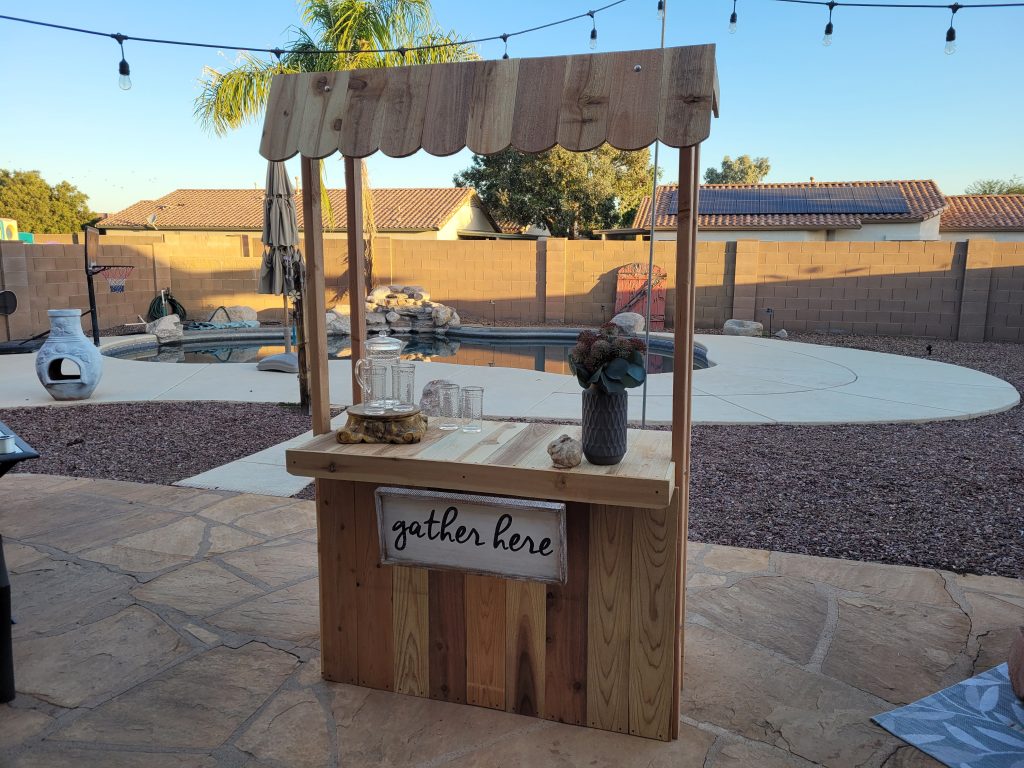
This project was so much fun. Want to learn more? Keep reading about our DIY hot chocolate stand build and how you can build one just like it.
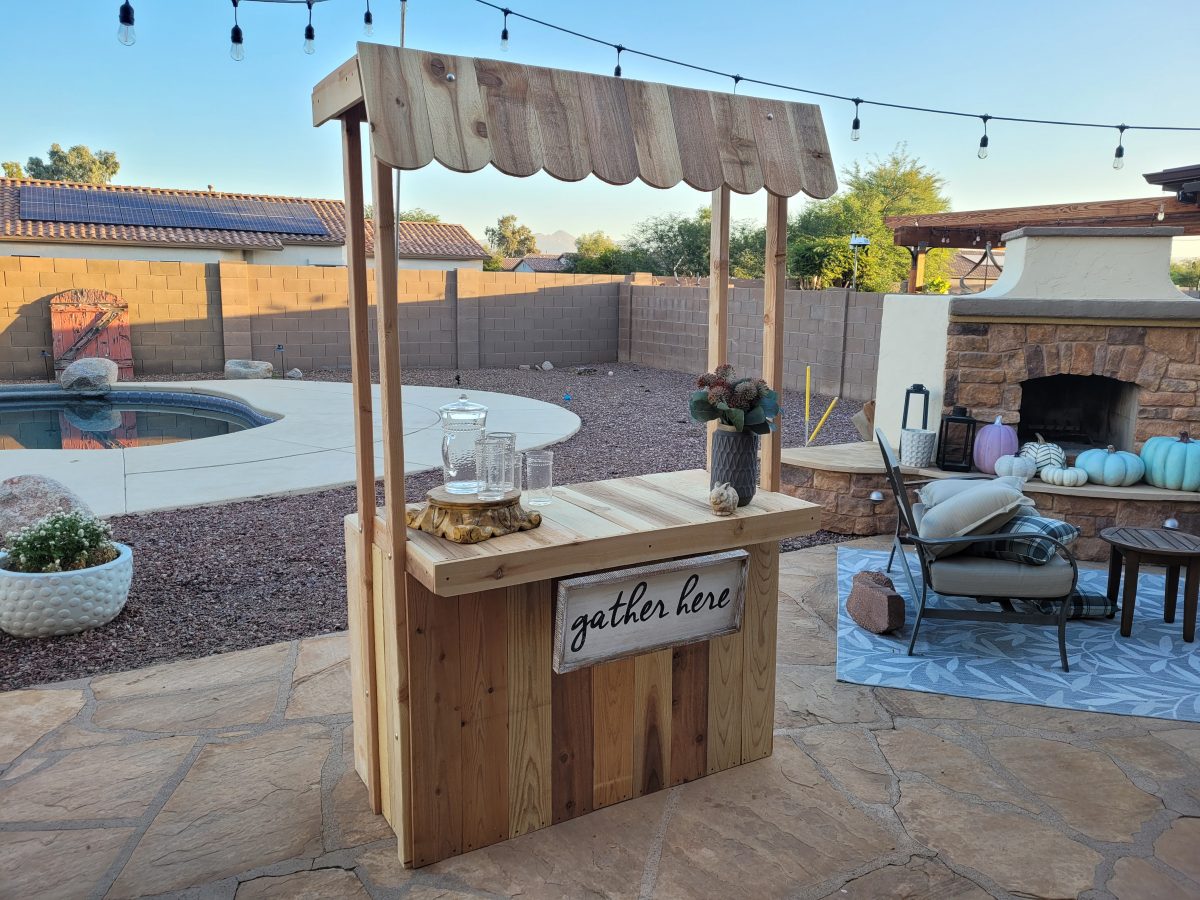
Build your own budget beverage bar project in just a few hours
Here we go again
The DIY bug hit us again here at Backyard Flare. This time we stepped outside the cinderblock and mortar world and we used a bit of wood. A few years ago we built a DIY beverage bar, and we used it primarily as a hot chocolate stand in the fall and winter months and as a lemonade stand in the spring and summer months. It was also used in craft fairs and weddings as a prop and for a decorative cool vibe. Friends and family would also borrow it all the time to use in their events and parties.
That first stand was really well built and it disassembled and broke down to a pretty small footprint for storage. Several carriage bolts held the bar together and it had a lot of structural integrity. A teacher friend ended up buying it from us to use as her desk and a focal point in her elementary school classroom, so we decided to build another one.
We Built it Again
This time, though, we documented the entire build with tons of detailed pics and we created a very comprehensive DIY construction plan for you. The plan has diagrams and the detailed pics that show you and written instructions that explain the build process. We are so proud of how it turned out and I’m sure these photos will show how well it was built. You can build one too as you follow along the 50 pages of DIY step by step plans. Yeah, I said it right. The plan is 50 whole pages.
We started our stop watch at the beginning of the construction and we turned it off when the build was complete. The build time from start to finish was a mere 7 hours on a Saturday morning and afternoon. My wife and I used the backyard patio as the build site as we didn’t need a huge area to work in.
You Ready to Build One Too?
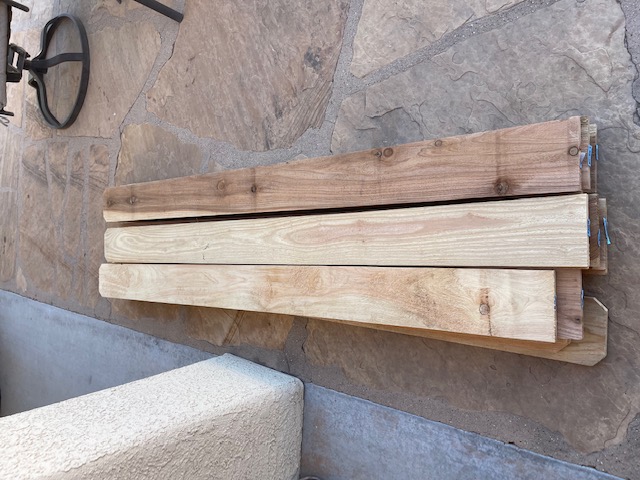
We picked out some really nice pieces
The comprehensive DIY construction plan includes a materials list for everything needed to build this exact bar. Everything was purchased at Lowes and we confirmed that our local Home Depot had the same size pieces of wood available too. The best part is that we only spent $170 for all the materials used. Yep, all of it. Really, that’s all. Hard to believe; we know.
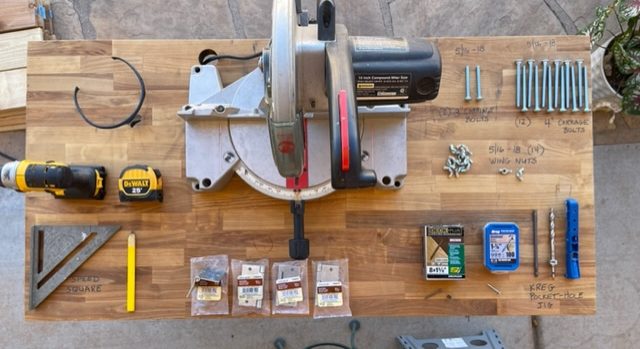
Here are the tools and the supplies other than wood that we used
The tools list in the DIY construction plan also shows each tool used to build the bar, so you will know exactly what you’ll need, to do it the way we did. Most of these tools can be rented or even borrowed if you don’t have them.
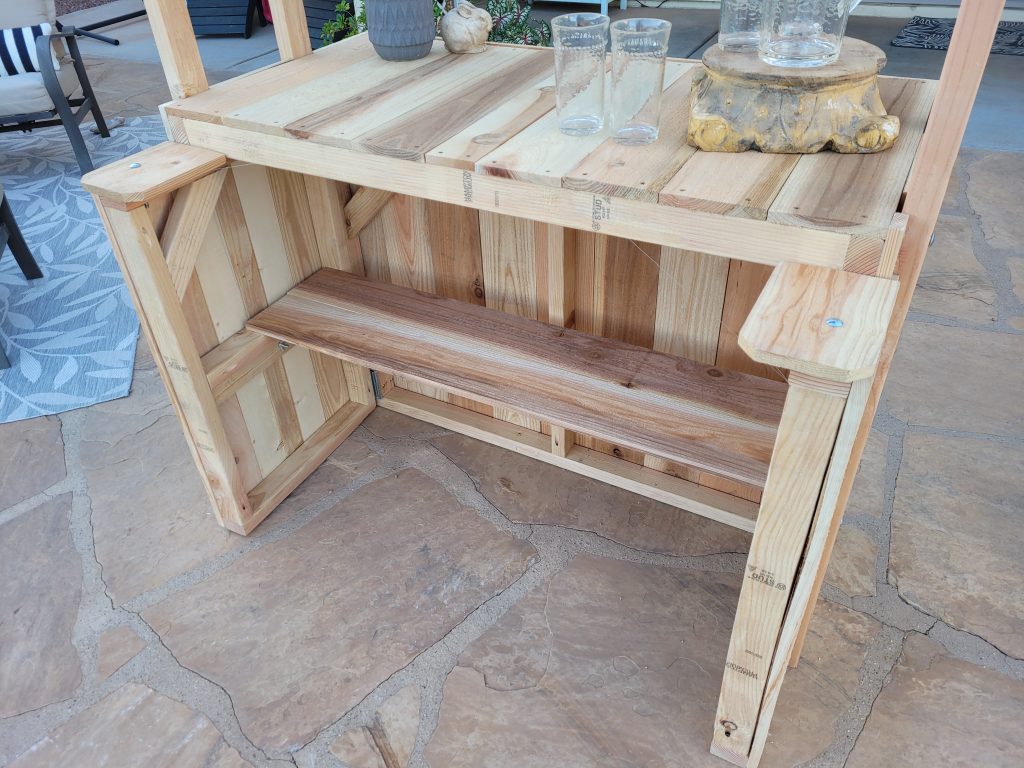
You even have a shelf inside the working part of the bar
Dimensions
This beverage bar weighs over one hundred pounds so it is not a tip hazard. The width is 48″ and the height of the structure is almost 7′ as designed. The scalloped topper added a ton of character to the stand and we can’t wait to use it.
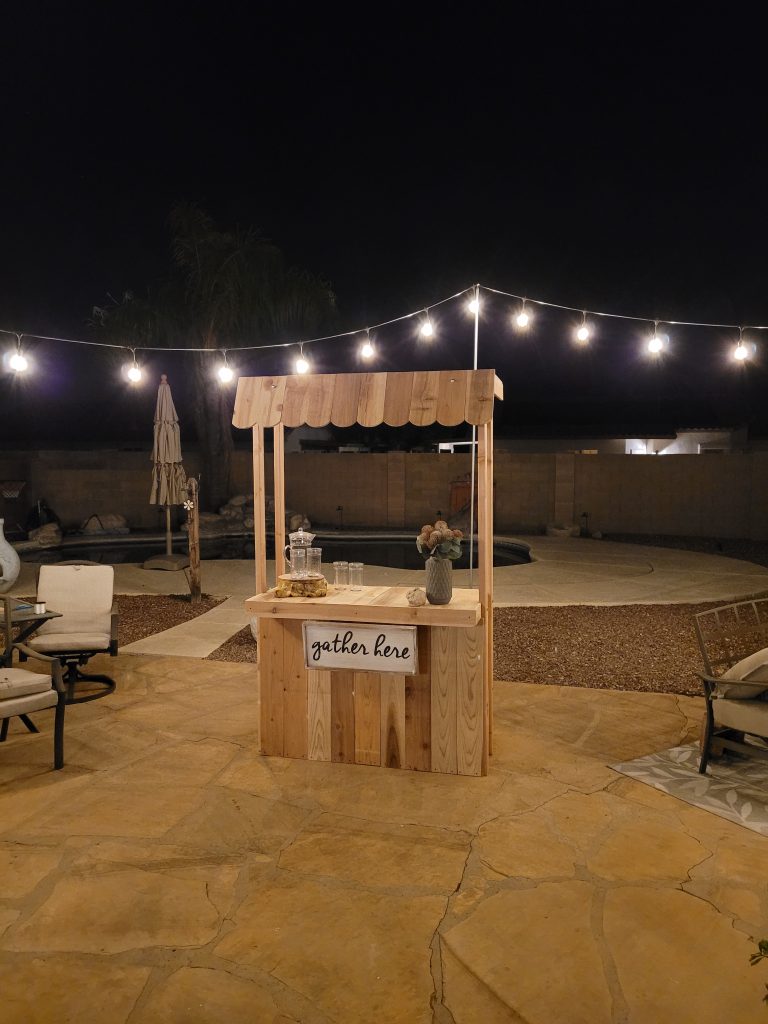
For parties, we will use it in our backyard and in the winter months, we will use it for hot chocolate while people tour the Christmas lights in our neighborhood. It’s become kind of a tradition over the years. So much fun to interact with jovial and interesting people. And there’s no better way to do it than over a cup of steaming hot chocolate topped with marshmallows and whipped cream.
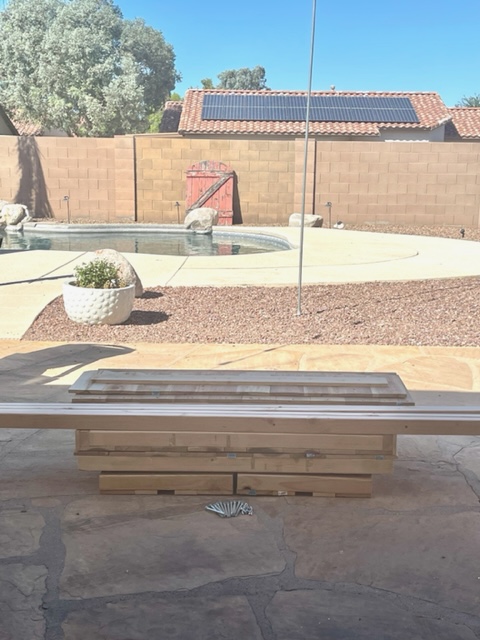
So Easy to Assemble and Disassemble
It’ll fit in most cars when broken down. Super easy to store
From the broken down storage position, the hot chocolate stand is assembled in under 7 minutes and no tools are required. It’s all held tightly together using carriage bolts and wing nuts. So easy and fun. The best part is that it only requires one person to assemble it.
Do you have an event such as a festival, wedding, craft fair, etc… that would look great with this inexpensive addition? Or do you have a business or VRBO that would benefit from this budget but elegant build? We would love to hear what you are thinking.
So easy for any level of DIYer
Please go to www.backyardflare.com for your copy of the beverage bar construction plan and start building today. The construction plan is only $24.99. We would love to hear from you.
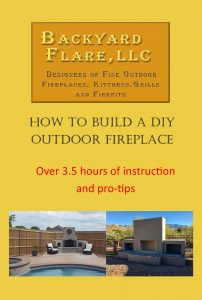
If you’re a homeowner and you love to save money doing things on your own, you are a DIYer by definition. This DIY status is great. But what if you don’t know the detailed build methods of what you are trying to do? Maybe a DIY Fireplace Video Tutorial is the answer.
There are so many great sources of information that will lead you to getting your DIY project completed. But so many times the information is vague and not complete. I’m talking about a DIY backyard masonry project. Where is the all inclusive tutorial information showing you exactly how to build an outdoor fireplace?
Where do you go to find the answers you are looking for?
We Have Your Solution
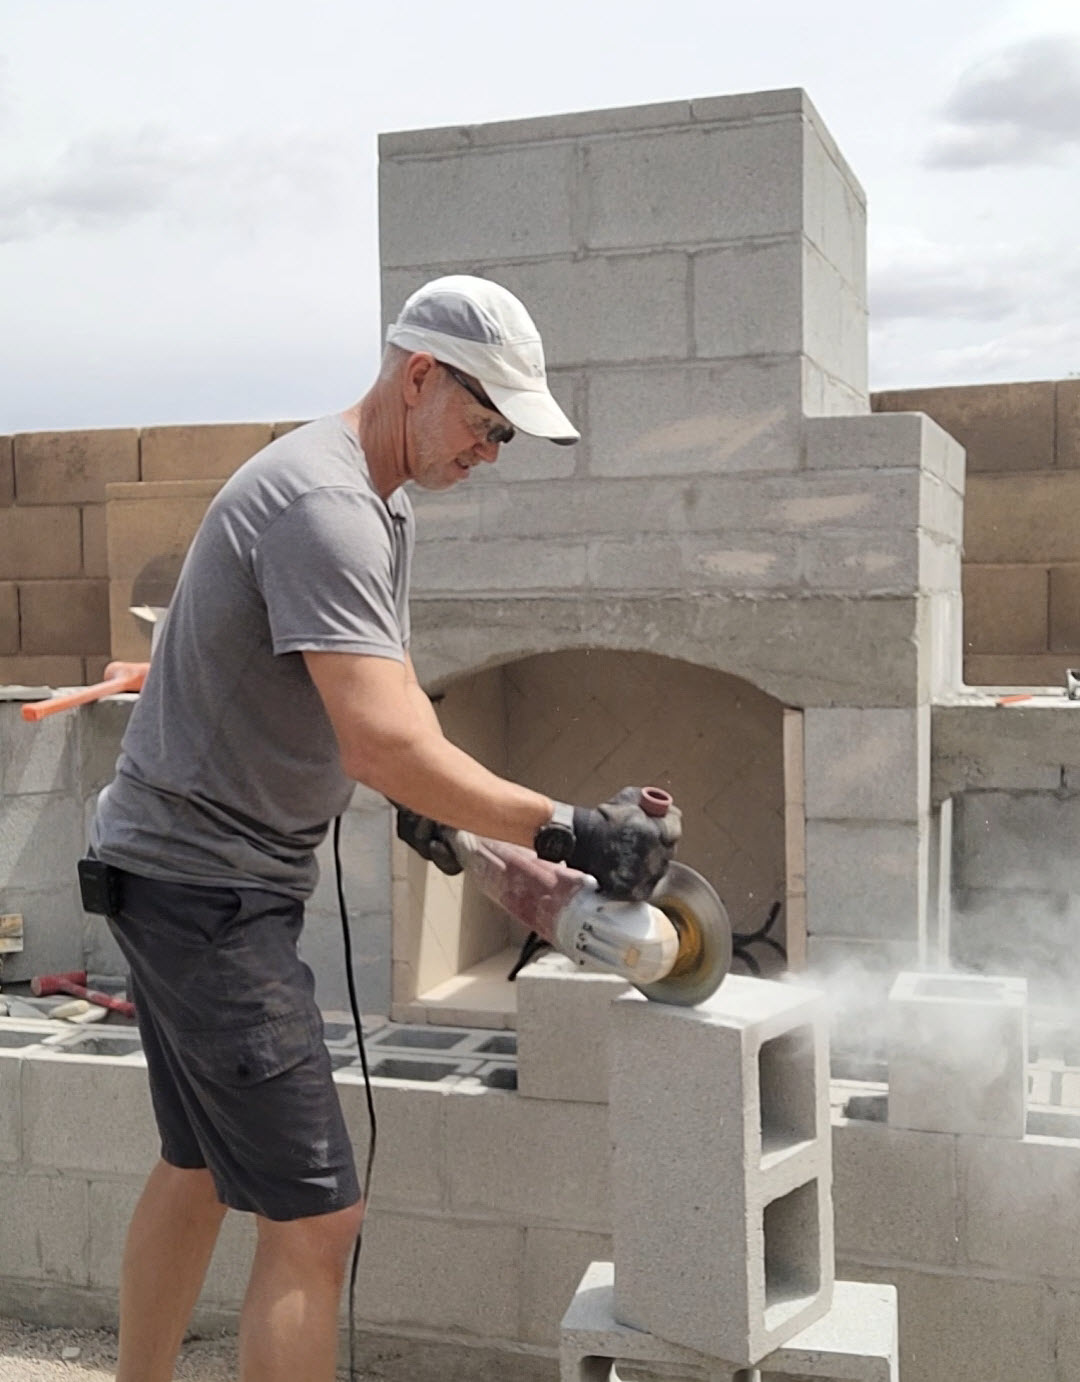
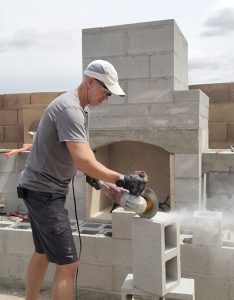
How to cut cinderblock the right way.
Well, here’s the answer. Dan at Backyard Flare, LLC in Tucson, Arizona, built a backyard DIY fireplace with a homeowner. They followed the Winslow design and construction plan offered at www.backyardflare.com. It was a great build as Dan got to work directly with a DIY homeowner and teach him along the way.
This DIY outdoor fireplace build took place over a week and the process was video and audio recorded for very detailed instructional steps. Each tutorial video segment was categorized and the videos show the exact way the building took place. It followed a masonry (block and mortar) method of construction. Everything was covered from the tools used and their safety, the materials used and explained in detail, and the build method involving the pouring of the arches. Metal and block cutting was explained and demonstrated, and mortar mixing and block laying was also covered. This video tutorial was made with you in mind, the DIY enthusiast who just needs a little bit more confidence and reassurance that you can do it.
Learning Has Never Been Easier
If you go to vimeo.com/ondemand/diyoutdoorfireplace and watch the trailer, you can see the up-close building that you can imitate in your own backyard. This is what a DIY Fireplace Video Tutorial needs to include. Watch Dan as he builds the fireplace and see how he explains the build process in detail. All aspects from the first blocks to the last and everything in between. The videos total 3 hours and 43 minutes of instruction.
Why Wait? Build Today!
If you want the best and most comprehensive tutorial video series showing DIY outdoor fireplace construction, then look no further. We know you’ll learn something. And the best part is that this tutorial isn’t just for the Winslow design as these building methods are used in all our DIY fireplace designs.
Get started on your fun and rewarding DIY outdoor fireplace project today. You’ll be glad you did because you will build a great outdoor destination and at the same time, you will add thousands to the value of your home.
So do you have a desire to add a DIY outdoor fireplace to your backyard? Have you been thinking about designs and placement? Anything you build on your own or have built to improve your outdoor living space will have a cost associated with it. Build costs can be drastically different when you compare a DIY built fireplace to one you pay to have built.
By saying that the build costs vary drastically, that is no overstatement in any way. Let’s break this down, starting with how much a DIY built fireplace would cost. When you get a construction plan from Backyard Flare, LLC, you will get a materials list that tells you exactly how many of each block, how much mortar, concrete, steel, etc, that you will need to build a specific design.
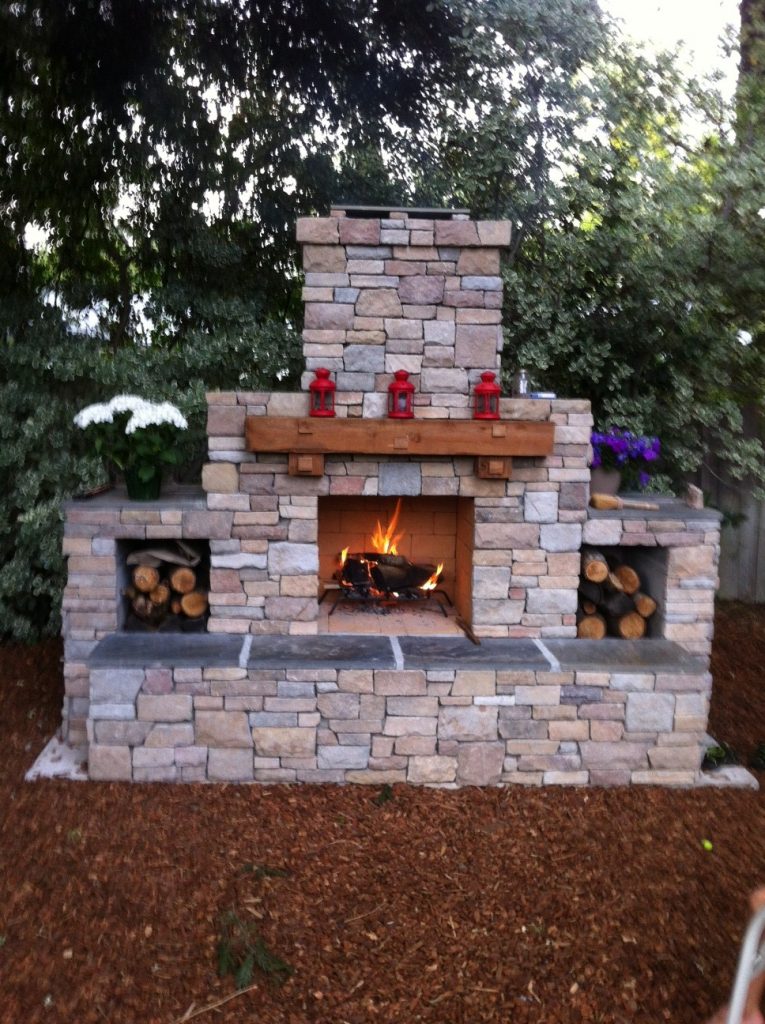
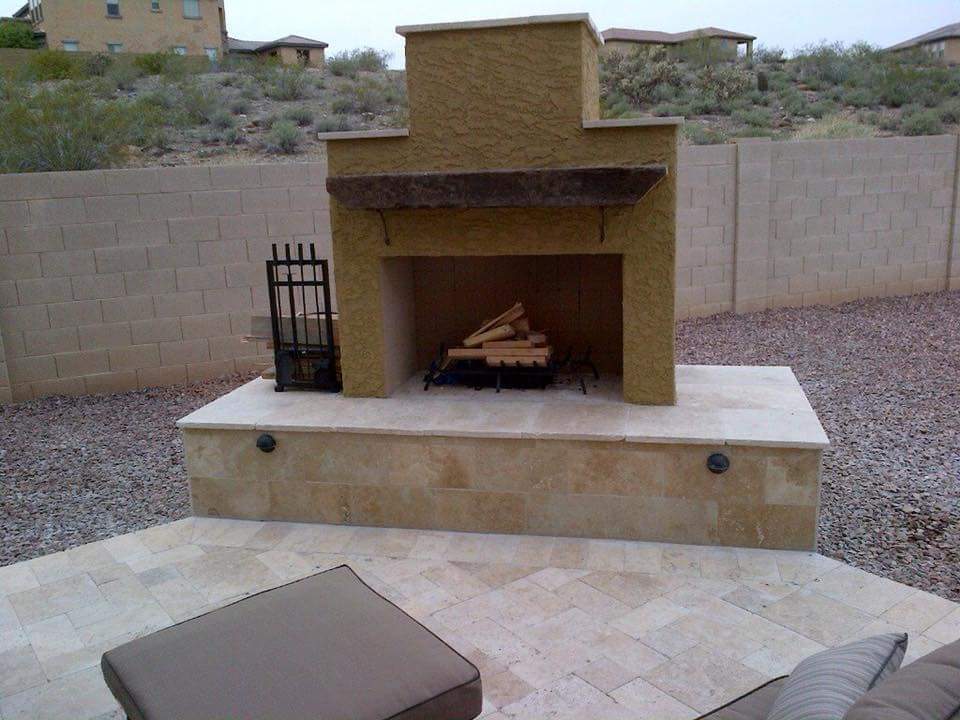
DIY Outdoor Fireplace – Tortolita Design – built by homeowner using a Backyard Flare construction plan
DIY Outdoor Fireplace Costs Broken Down
Each building material has a cost, so for ease of explanation, let’s use $1.00 as the cost for a block, $3.00 for a bag of concrete, and $4.00 for a bag of mortar. Let’s then throw in $300.00 for other build materials like firebrick, wood, angle iron, and rebar. If you have a fireplace design that would require 150 blocks, that is $150.00 to start. Let’s say 10 bags of mortar and 15 bags of concrete also, so that would be $40.00 and $45.00, respectively. With the added $300.00, the total would be approximately $545.00 for the rough building materials.
Let’s say you were able to pour your own foundation for $300.00 in materials. Also, that you found a great looking veneer for a total of $500.00. Adding these costs to the rough build, your total build materials for the fireplace would be approximately $1,345. With no labor costs, and only sweat equity and a whole lot of fun, your costs wouldn’t exceed that for the most part.
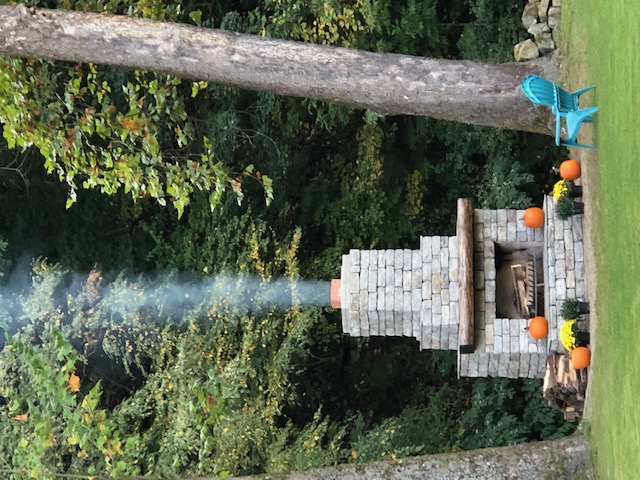
This is our Cholla design built by a DIY homeowner
Contractor Costs Broken Down
When you have a contractor build the fireplace, you need to start with the $1,345 cost for materials to get a decent calculation. Most of the time, there are additional costs associated with mark-up for the materials. We won’t add those in. At least here in the Arizona area, we have figured out that average labor costs are 4-5 times the materials cost. These calculations would be $1,345 X 4 and $1,345 X 5. These equal $5,380 and $6,725, respectively.
These two labor amounts are only approximate and they are not set in stone. When you add the two labor costs to the $1,345 cost for materials, you could expect to pay $6,725 to $8,070 for the fireplace.
Are you Convinced Yet?
When we look at the differences between the costs of a DIY built fireplace and a contractor built fireplace, there are literally thousands of dollars separating them. Most people would agree that saving money is important. This savings can be directly attributed to building your fireplace DIY style.
When you’re ready to build a gorgeous outdoor fireplace on a budget, your first stop should be www.backyardflare.com. We can offer you a step by step DIY construction plan that will guide you all the way through your build. No sense in trying to figure it out on your own. Starting at only $39.99, you will have the best and most comprehensive DIY construction plan on the market. We look forward to helping you with your DIY project.
If you’re reading this, you either stumbled on it, or you were actively searching for information on how to build a DIY outdoor fireplace. Either way, welcome and I am so happy that I can share this with you. I get questions on a daily basis from people who say they were excited when they finally found Backyard Flare. Building a DIY outdoor fireplace became a reality at that time for many people who originally thought they needed to figure it out on their own.
Build your DIY outdoor fireplace and then veneer it however you like. There are no rules.
Can anyone really do it? Actually “yes” you can.
So, if you are able to lift a bag of concrete off the ground, then I believe you have what it takes to build a DIY outdoor fireplace. Believe me, it doesn’t require that you have to have worked with masonry before. If you have only ever seen cinder blocks while walking past them at Home Depot or Lowes, you are still able to build if you follow our construction plans.
Print your DIY outdoor fireplace plan and bring it to the work site. So easy.
Our designs are very simple even though they are absolutely gorgeous. And the best part is that the majority of our customers are people who are new to the world of DIY outdoor fireplace building. Many have never mixed mortar or used power tools. Our construction plans show people in a very detailed way how to go about putting a DIY outdoor fireplace together.
What do the DIY outdoor fireplace plans work?
We created DIY outdoor fireplace construction plans that are so easy to follow and comprehensive. Most of the guess work is taken away. The construction plans contain large, easy to see, isometric diagrams, and lots of very detailed written instructions. Imagine following a Lego book, but add the written part in as well for more detail. You will take the materials list in the plan and buy exactly what it says, as we have calculated each block and material down to the amount you’ll need. Pretty cool huh?
Cinder block anyone?
Our DIY outdoor fireplace construction plans all follow a cinder block build method. You will be able to pick out whatever veneer you like to finish the structure. By the end of the build, you’ll be high-fiving your family and friends. Then it’s time to get ready to enjoy the warmth of a raging fire on a cool night.
If you’re looking for more information and pics, or just some more inspiration, check out our Instagram profile, “backyardflare”, and our Pinterest profile, “DIY Outdoor”. We know you’ll find something that will look great in your backyard. Let us know how we can help you succeed and how to save thousands at the same time.
When you’re ready to get your plan, go to Backyard Flare, and pick out your favorite design. Once you purchase it, you will receive it in PDF directly to your email. We strive to serve you and to make sure your building experience is the best it can be. Let us show you the reality to outdoor comfort. Call or text me (Dan) direct at 520-269-9740 if you want a free consult. I’ll be waiting.
Have you been wondering what you’re going to put in your outdated or boring backyard? Have you looked at it long enough with disgust and with the feeling that you never really want to hang out back there? What about an outdoor fireplace?
You should explore different options for filling that space with an amazing outdoor fireplace and outdoor kitchen. And…if you decide to build the structures by yourself, you will save thousands of dollars in comparison to having a construction company build it for you.
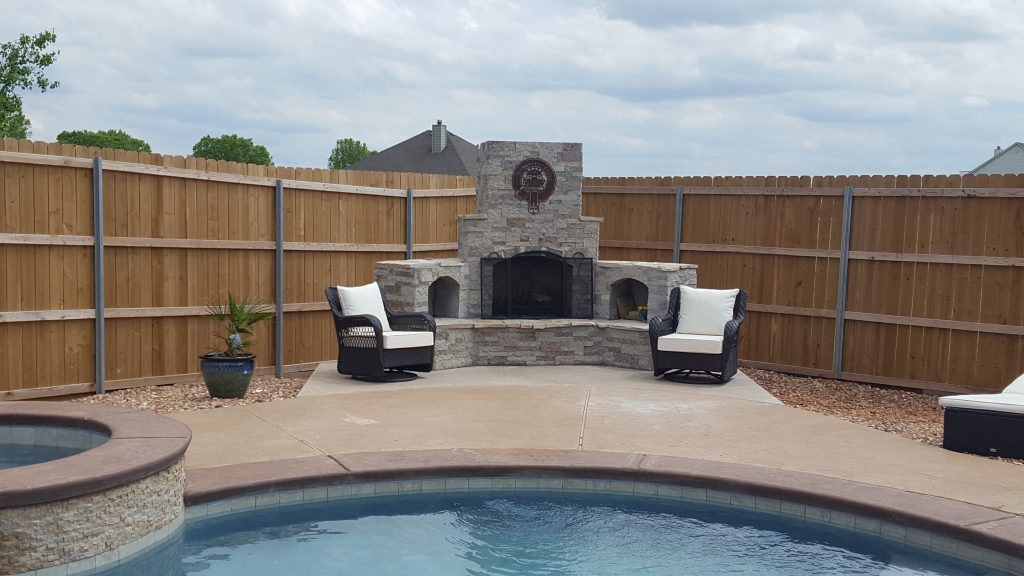
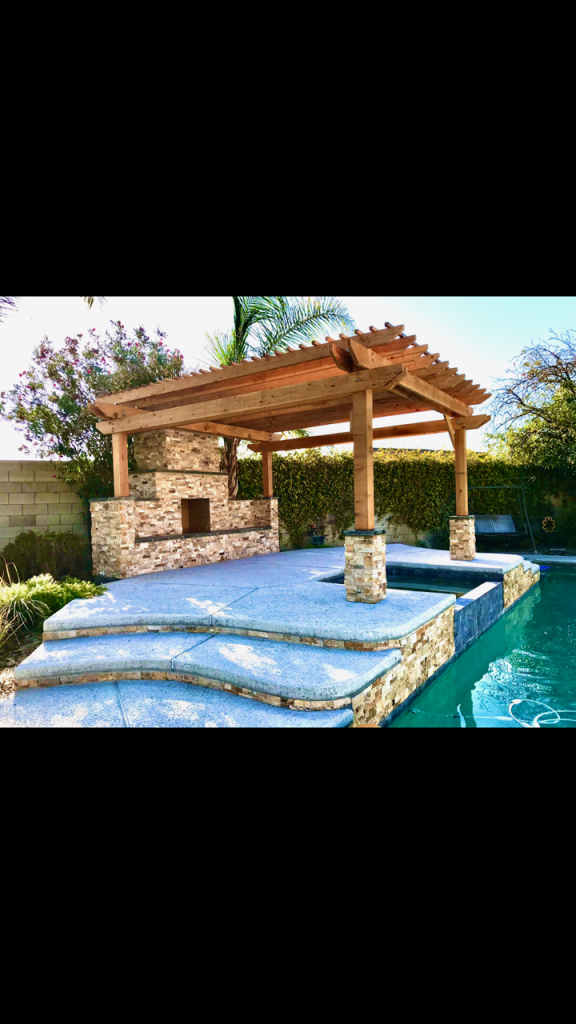
Outdoor poolside fireplace built by a DIY homeownerOur world famous Prescott design built by a DIY homeowner
Look at what our customers are doing with their backyards. They are adding gorgeous destinations on their tree lines, with tall and bold designs. They are building very simple but elegant outdoor fireplace and grill structures off their existing patios, and they are adding the wow factor to their swimming pool decks.
The Power is Yours – Get a DIY Plan
When you decide that you want a stunning and functional backyard at a budget price, then visit Backyard Flare for the best and most comprehensive outdoor fireplace and grill construction plans on the market. It doesn’t get any easier than that. What are you waiting for, visit Backyard Flare, pick your favorite design, get the plan, buy the materials, and start building.
Unparalleled Service Guaranteed
We strive to stay the course with you while you build. Backyard Flare wants to be involved in your progress both with pictures, but also with phone calls and emails.
We are always available to you either while you’re in the planning phase or the building phase. Call Dan at 520-269-9740 for a free discussion on your backyard and decide if a DIY outdoor fireplace is in your future. Thanks and I hope to hear from you soon.
Have you given any thought to building something in your backyard? Maybe something like an outdoor fireplace? You don’t need a lot of room either. It will add thousands to the value to your home, but it doesn’t have to cost thousands to build. That’s where Backyard Flare comes in.
This is our Cholla design built by a DIY homeowner
How Does It Work?
You can do the labor yourself by following a DIY construction plan from Backyard Flare, making your outdoor fireplace a smooth process. We got you covered with building info and unparalleled customer service. There are so many beautiful outdoor fireplace designs available, big and small, short and tall. Even if you build the same design as someone else, it’s guaranteed to look different because you get to pick the veneer and finish options. How cool is that?
Small outdoor fireplaces can add lots of value to your home too
It’s never been easier than now to get going on this amazing adventure, and you will build with confidence. Just knowing that you don’t have to figure it out will make your experience lots of fun and we are always available to you even while you’re building your outdoor fireplace.
Outdoor fireplaces are so enjoyable with family and friends
Best DIY Plans Available
Our DIY construction plans have a materials list, a tools list, lots of detailed diagrams, and very comprehensive written instructions that will guide you through your build process. The construction plans will show you the position of each cinder block by row and you’ll feel like you’re stacking adult size Legos. We will email the outdoor fireplace construction plan directly to you so no waiting for them to show up in the mail. You could be building sooner than you think.
Get Started Today
Why not get started on your project today? Visit our website at www.backyardflare.com and get inspired. We’re sure you’ll want to jump in and build one once you see how easy it can be. Thanks and we hope to hear from you.
Gorgeous DIY outdoor fireplace built by a homeowner using our construction plan
I love phone calls
I love the fact that we have helped lots of DIYers with DIY fireplace plans. We also love to hear feedback from our customers. The other day I answered my phone and began speaking with a past customer who built a Pima II fireplace design. Karen explained that she had received some bids from contractors to build an outdoor fireplace in her backyard and was blown away at the price tag. She wasn’t prepared to pay what was bid.
Karen elected at that point to start looking for assistance. She stumbled on Backyard Flare’s website while searching for “DIY fireplace plans”. After reviewing our designs, Karen said she picked the Pima II because of the large firebox and the low rough materials cost.
Inexpensive DIY outdoor Pima II fireplace built by a homeowner, stucco and travertine covered with a wooden mantel and lighting
I listened as she told me about her building experience and about how much fun and how fulfilling it was to complete the construction by her and her family. She said that she never thought she could build a DIY fireplace on her own…that was until she discovered our plans.
I was happy to get that phone call because it solidified what we have known for years. We design our fireplaces for the customers that don’t have a ton of masonry building experience. Some don’t have any at all. Our simplistic build plans cater to the DIY homeowners that want to step into a DIY project. They may need just a little bit of instruction to get started.
Get started on your project
We know that you have what it takes to build one too and we are eager to hear about your backyard and your plans to transform it. Text Dan at 520-269-9740 and let’s discuss your design ideas. Let’s talk and know that it’s free, and with no obligation.
Take care and happy building to you. It’s time to get started!!! Go to Backyard Flare to pick your favorite design.
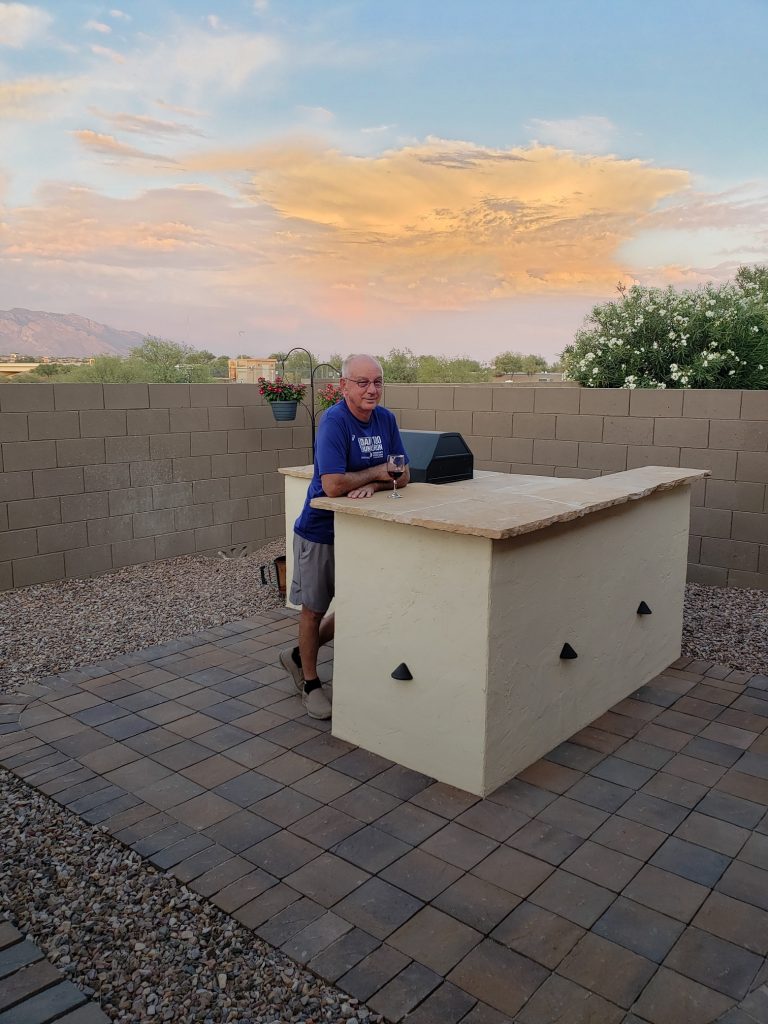
My father in-law standing proud with his new outdoor kitchen.
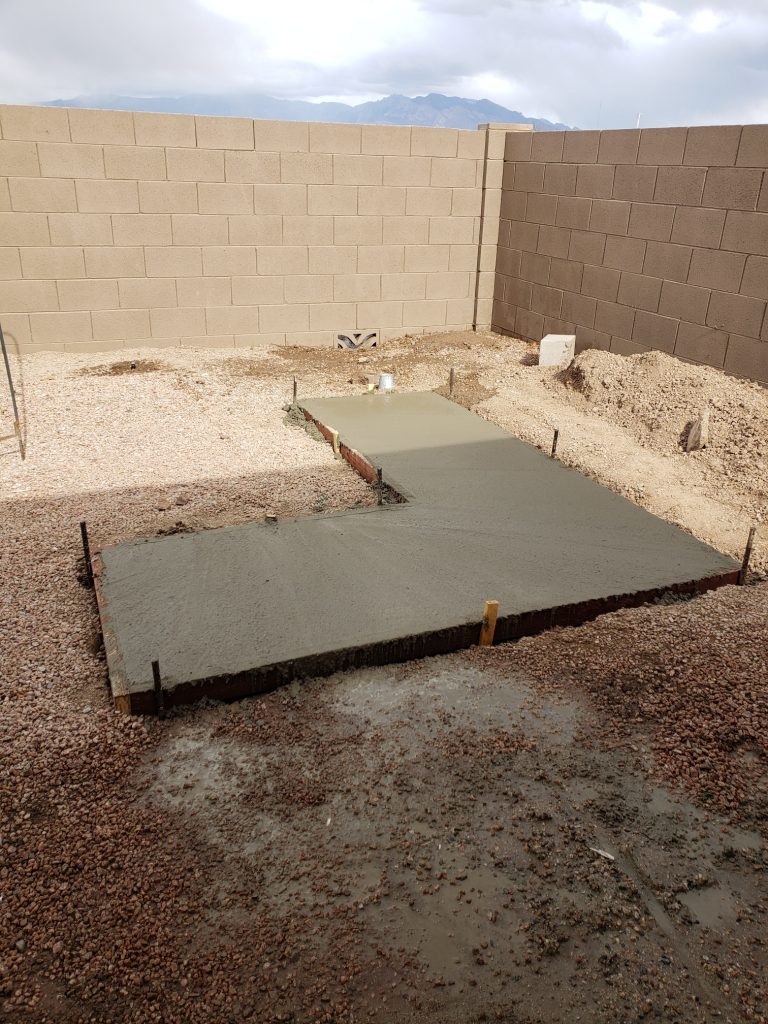
Our DIY outdoor kitchen build began with some ground excavation and measuring for slab height as compared to the existing concrete patio. This was very important as we planned to add brick pavers from the patio to the base of the outdoor kitchen and we wanted it to match up perfectly. Once we determined the proper slab height, we built our wood forms, tamped and prepared the ground, added our steel mesh, and got to pouring the concrete.
Slab was poured in approximately 35 minutes
My father in law and I worked in tandem, with me mixing and pouring the concrete and him screeding the wet mix. Within 35 minutes, we had the concrete done and we waited for it to start setting up.
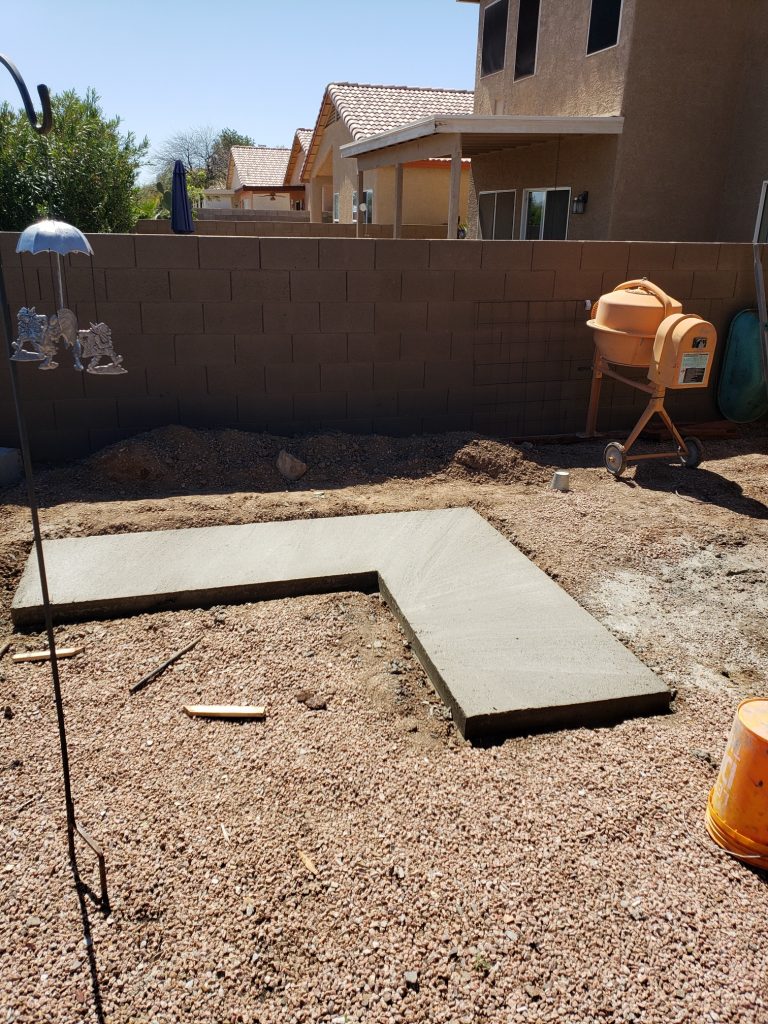
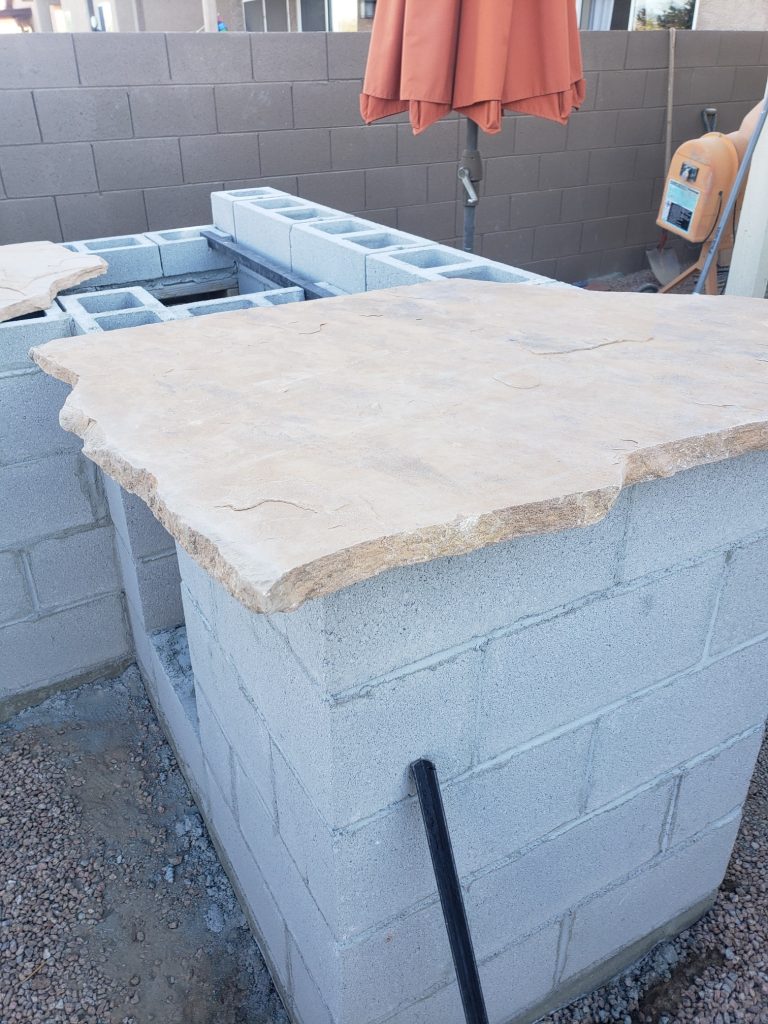
Two days later, we pulled the forms off and exposed a great looking L shaped slab that was waiting for some mortar and block. Once the block laying began, we worked for approximately 6 hours to complete the rough block build.
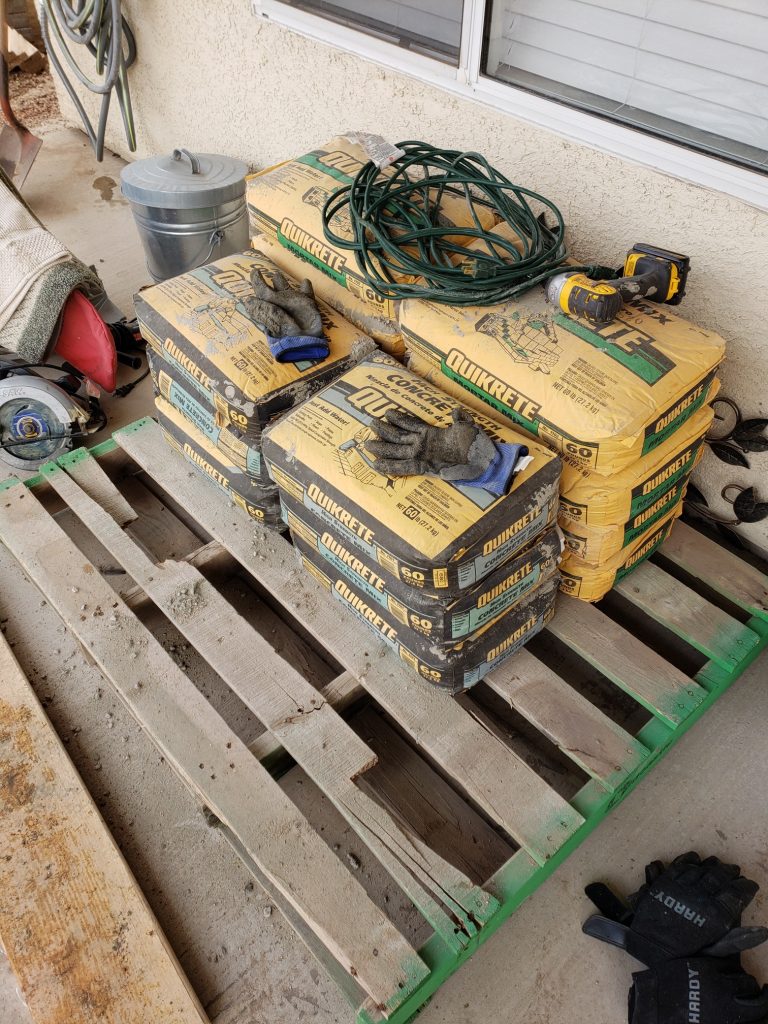
We mixed our N-type mortar in a mixing bin and got 15 blocks mortared in place with each 60-lb bag. This is how much you can generally get done if you don’t waste or lose too much mortar on the ground.
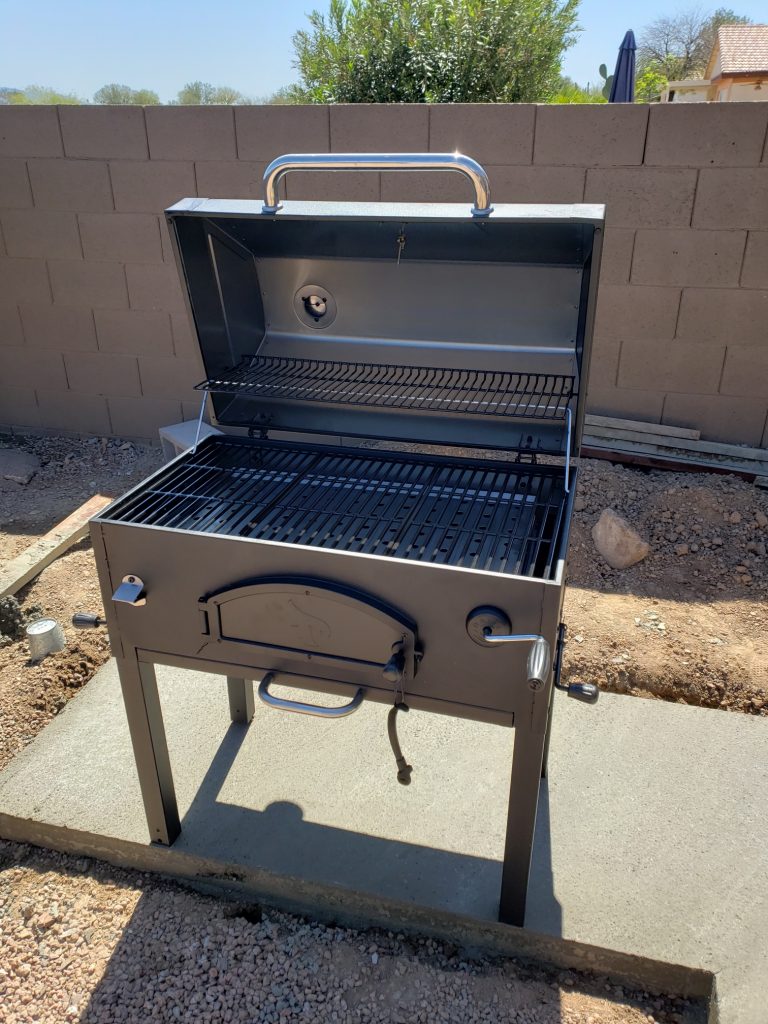
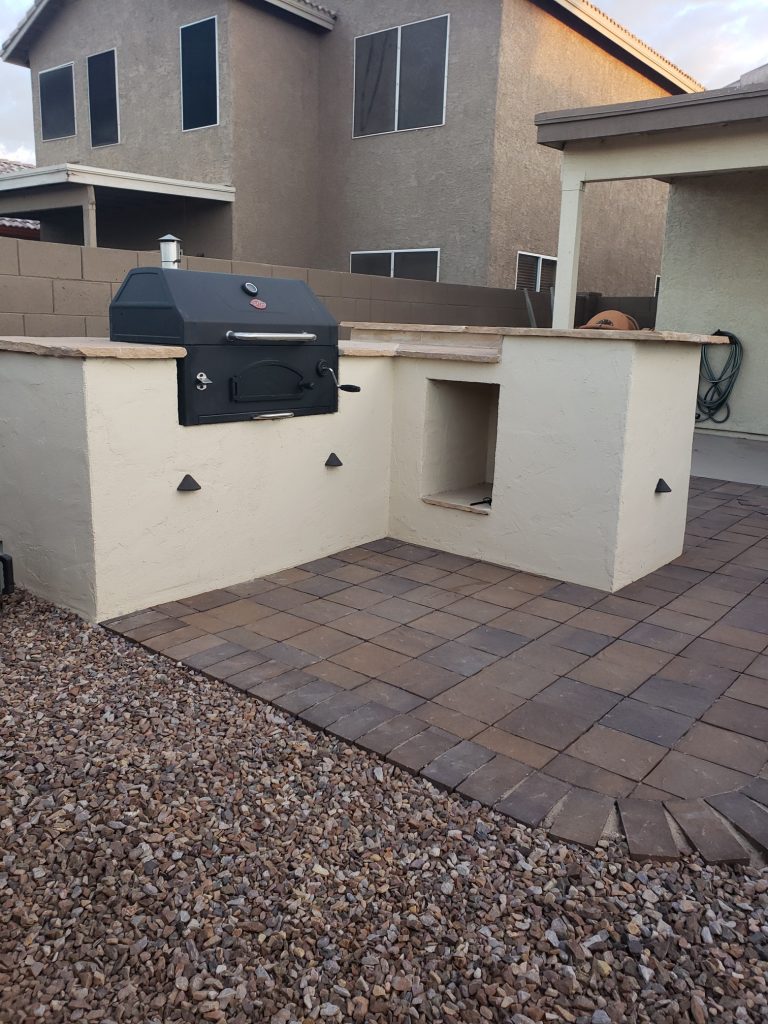
@charbroil grills are a great way to go for a great look and functionality
@Charbroil for Functionality
We dismantled a Char-Broil charcoal grill and built a base for the cooking system to sit on. The counter height was a standard 36″ and with a gorgeous flagstone, the raised bar and counter was finished. The outer edge of the flagstone was a very cool chisel cut for a rustic look.
Flagstone is a great counter and bar material
Finish Work – Stucco and LEDs
I applied stucco to the sides of the structure and painted it to match our previously built outdoor fireplace. We ran some low voltage lighting cord and added great looking LED lights for additional ambiance. We hoped to keep the outdoor kitchen build to a minimum and we ended up spending right at $1,000 total on the structure. This cost included the material, lights, counter, and even the grill. Amazing what you can do when you have a plan to follow. A DIY outdoor kitchen can be in your future.
Lighting is the best way to add a rich look
Let us know how we can help you with a DIY outdoor kitchen construction plan. It doesn’t have to cost an arm and leg so let us show you how to do it.