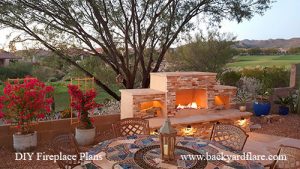
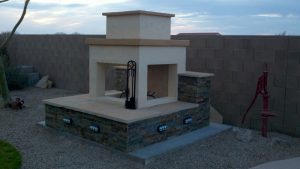
There are many ways to build a “do it yourself” outdoor fireplace. A DIY construction plan is the way to go. We got what you need.
There are several different options with regard to the building materials available. We tend to go with what we believe is the best way to build, and it is cinderblock. We strongly believe that building with cinderblock will give you a structure that will certainly outlive you. Nothing is more resilient than concrete block.
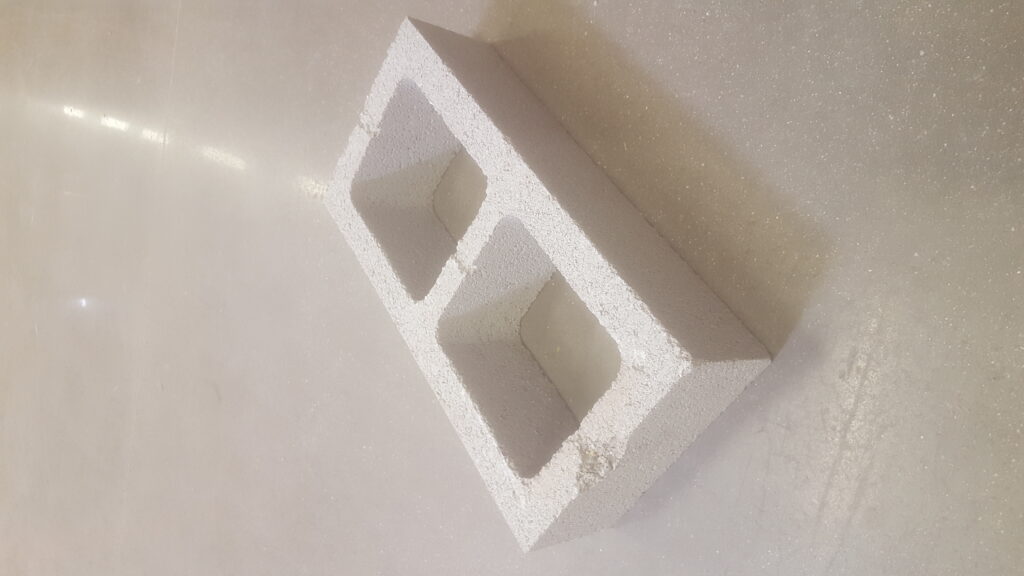
8x4x16 block
Good News For You
So, what does that mean for you? It means that all you have to do is go to Backyard Flare, LLC and search for your favorite outdoor fireplace design. We are sure you will find one that will fit your space whether you have a wide-open area or whether you have a smaller intimate space.
You may have any questions concerning our build method or the wonderful world of building your own DIY outdoor fireplace. If so, please call or text Backyard Flare, LLC at 520-269-9740. It’s never been easier to build a DIY outdoor fireplace. We look forward to hearing from you and working with you on your amazing new backyard. -Dan
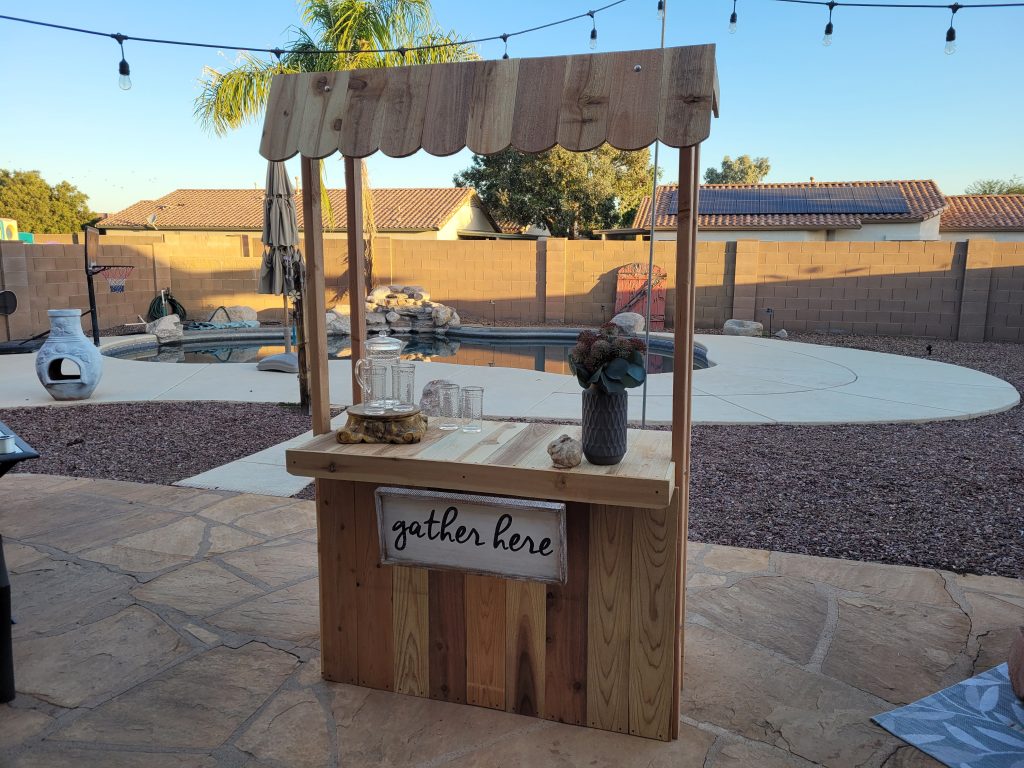
This project was so much fun. Want to learn more? Keep reading about our DIY hot chocolate stand build and how you can build one just like it.
Build your own budget beverage bar project in just a few hours
Here we go again
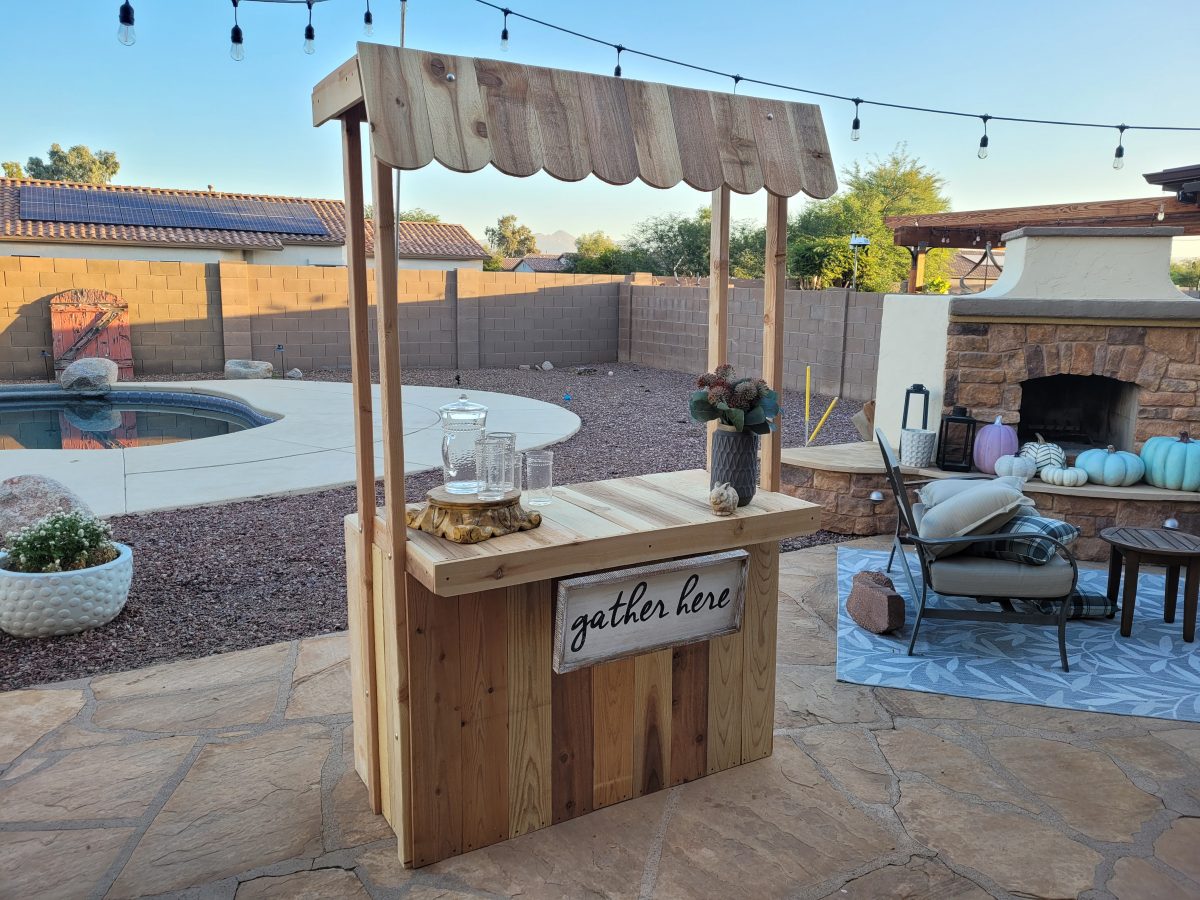
The DIY bug hit us again here at Backyard Flare. This time we stepped outside the cinderblock and mortar world and we used a bit of wood. A few years ago we built a DIY beverage bar, and we used it primarily as a hot chocolate stand in the fall and winter months and as a lemonade stand in the spring and summer months. It was also used in craft fairs and weddings as a prop and for a decorative cool vibe. Friends and family would also borrow it all the time to use in their events and parties.
That first stand was really well built and it disassembled and broke down to a pretty small footprint for storage. Several carriage bolts held the bar together and it had a lot of structural integrity. A teacher friend ended up buying it from us to use as her desk and a focal point in her elementary school classroom, so we decided to build another one.
We Built it Again
This time, though, we documented the entire build with tons of detailed pics and we created a very comprehensive DIY construction plan for you. The plan has diagrams and the detailed pics that show you and written instructions that explain the build process. We are so proud of how it turned out and I’m sure these photos will show how well it was built. You can build one too as you follow along the 50 pages of DIY step by step plans. Yeah, I said it right. The plan is 50 whole pages.
We started our stop watch at the beginning of the construction and we turned it off when the build was complete. The build time from start to finish was a mere 7 hours on a Saturday morning and afternoon. My wife and I used the backyard patio as the build site as we didn’t need a huge area to work in.
You Ready to Build One Too?
We picked out some really nice pieces
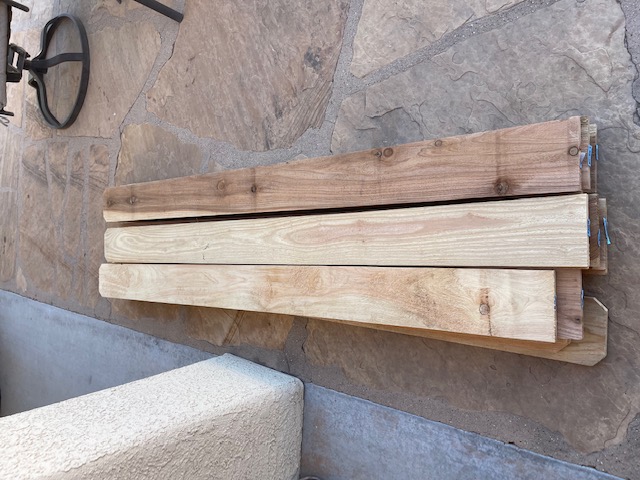
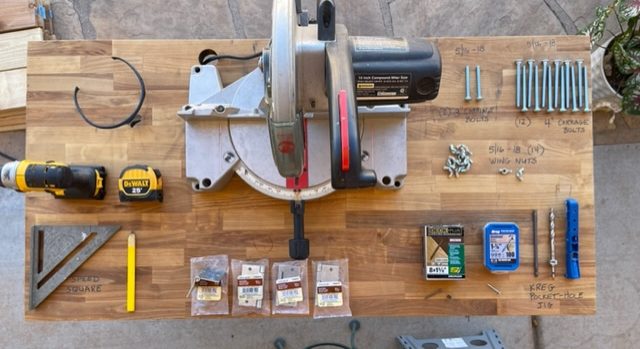
The comprehensive DIY construction plan includes a materials list for everything needed to build this exact bar. Everything was purchased at Lowes and we confirmed that our local Home Depot had the same size pieces of wood available too. The best part is that we only spent $170 for all the materials used. Yep, all of it. Really, that’s all. Hard to believe; we know.
Here are the tools and the supplies other than wood that we used
The tools list in the DIY construction plan also shows each tool used to build the bar, so you will know exactly what you’ll need, to do it the way we did. Most of these tools can be rented or even borrowed if you don’t have them.
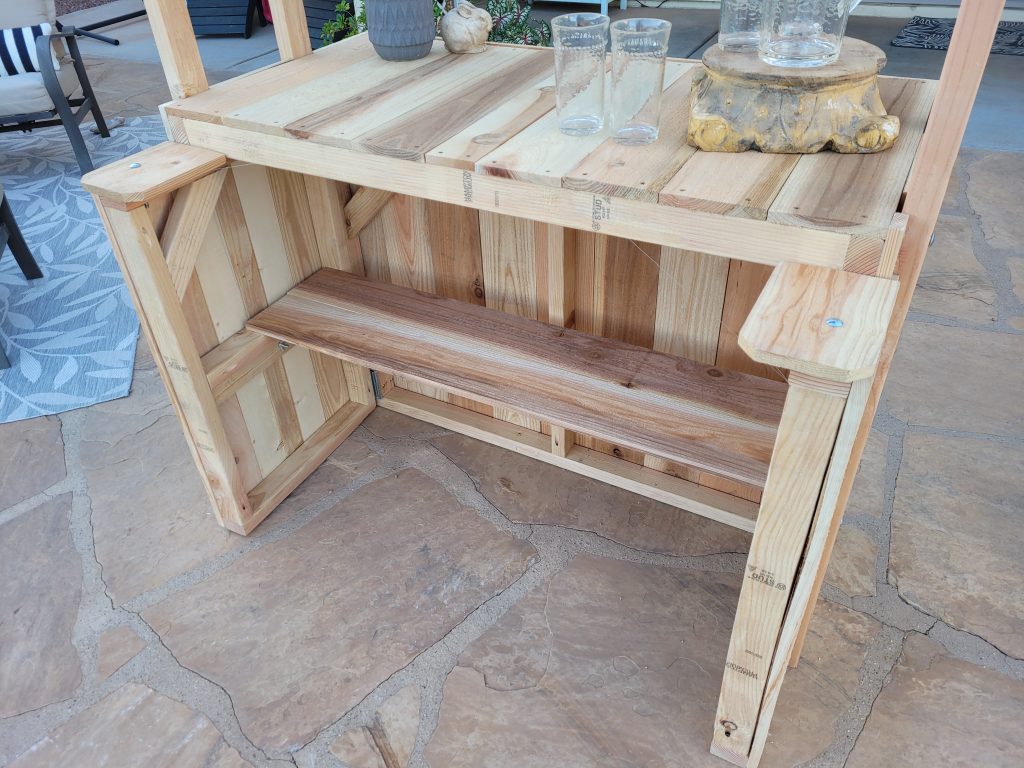
You even have a shelf inside the working part of the bar
Dimensions
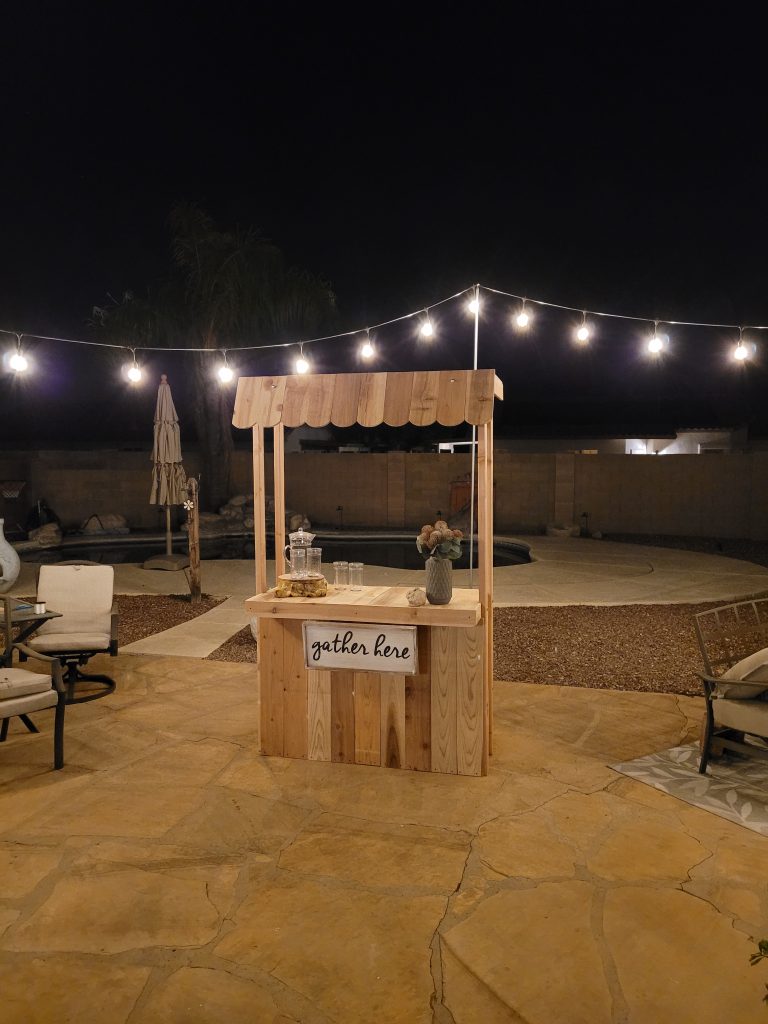
This beverage bar weighs over one hundred pounds so it is not a tip hazard. The width is 48″ and the height of the structure is almost 7′ as designed. The scalloped topper added a ton of character to the stand and we can’t wait to use it.
For parties, we will use it in our backyard and in the winter months, we will use it for hot chocolate while people tour the Christmas lights in our neighborhood. It’s become kind of a tradition over the years. So much fun to interact with jovial and interesting people. And there’s no better way to do it than over a cup of steaming hot chocolate topped with marshmallows and whipped cream.
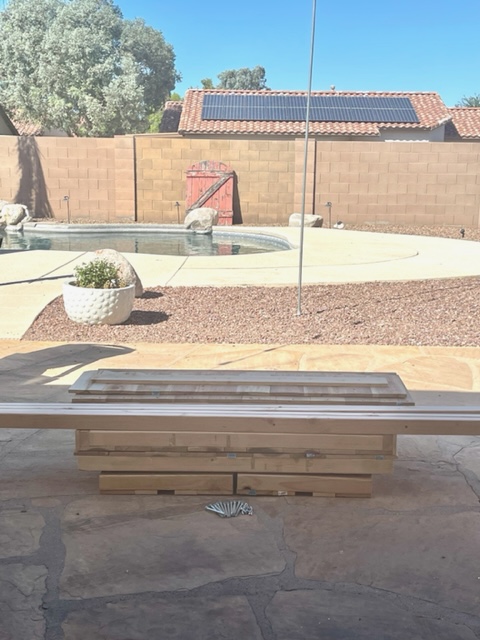
So Easy to Assemble and Disassemble
It’ll fit in most cars when broken down. Super easy to store
From the broken down storage position, the hot chocolate stand is assembled in under 7 minutes and no tools are required. It’s all held tightly together using carriage bolts and wing nuts. So easy and fun. The best part is that it only requires one person to assemble it.
Do you have an event such as a festival, wedding, craft fair, etc… that would look great with this inexpensive addition? Or do you have a business or VRBO that would benefit from this budget but elegant build? We would love to hear what you are thinking.
So easy for any level of DIYer
Please go to www.backyardflare.com for your copy of the beverage bar construction plan and start building today. The construction plan is only $24.99. We would love to hear from you.
Man, I love building things, both big and small. Like I stated in the header, “DIY Rocks…Nothing More”. I look around my home and I am amazed at what my wife and I have been able to build and remodel. The list is long, from hanging new doors, flooring throughout, adding cabinets to the laundry room, tile work, paint, baseboards, wall additions, wiring and plumbing, etc…
DIY Rocks
There really hasn’t been a room or area of our home that we haven’t had a direct impact on, DIY style. The inside has been a blast to build, but it doesn’t stop there. We love our backyard outdoor living area too and we do use it a lot. I would say we use it almost everyday, with the exception of mosquito season. That’s just miserable.
Building Our Backyard
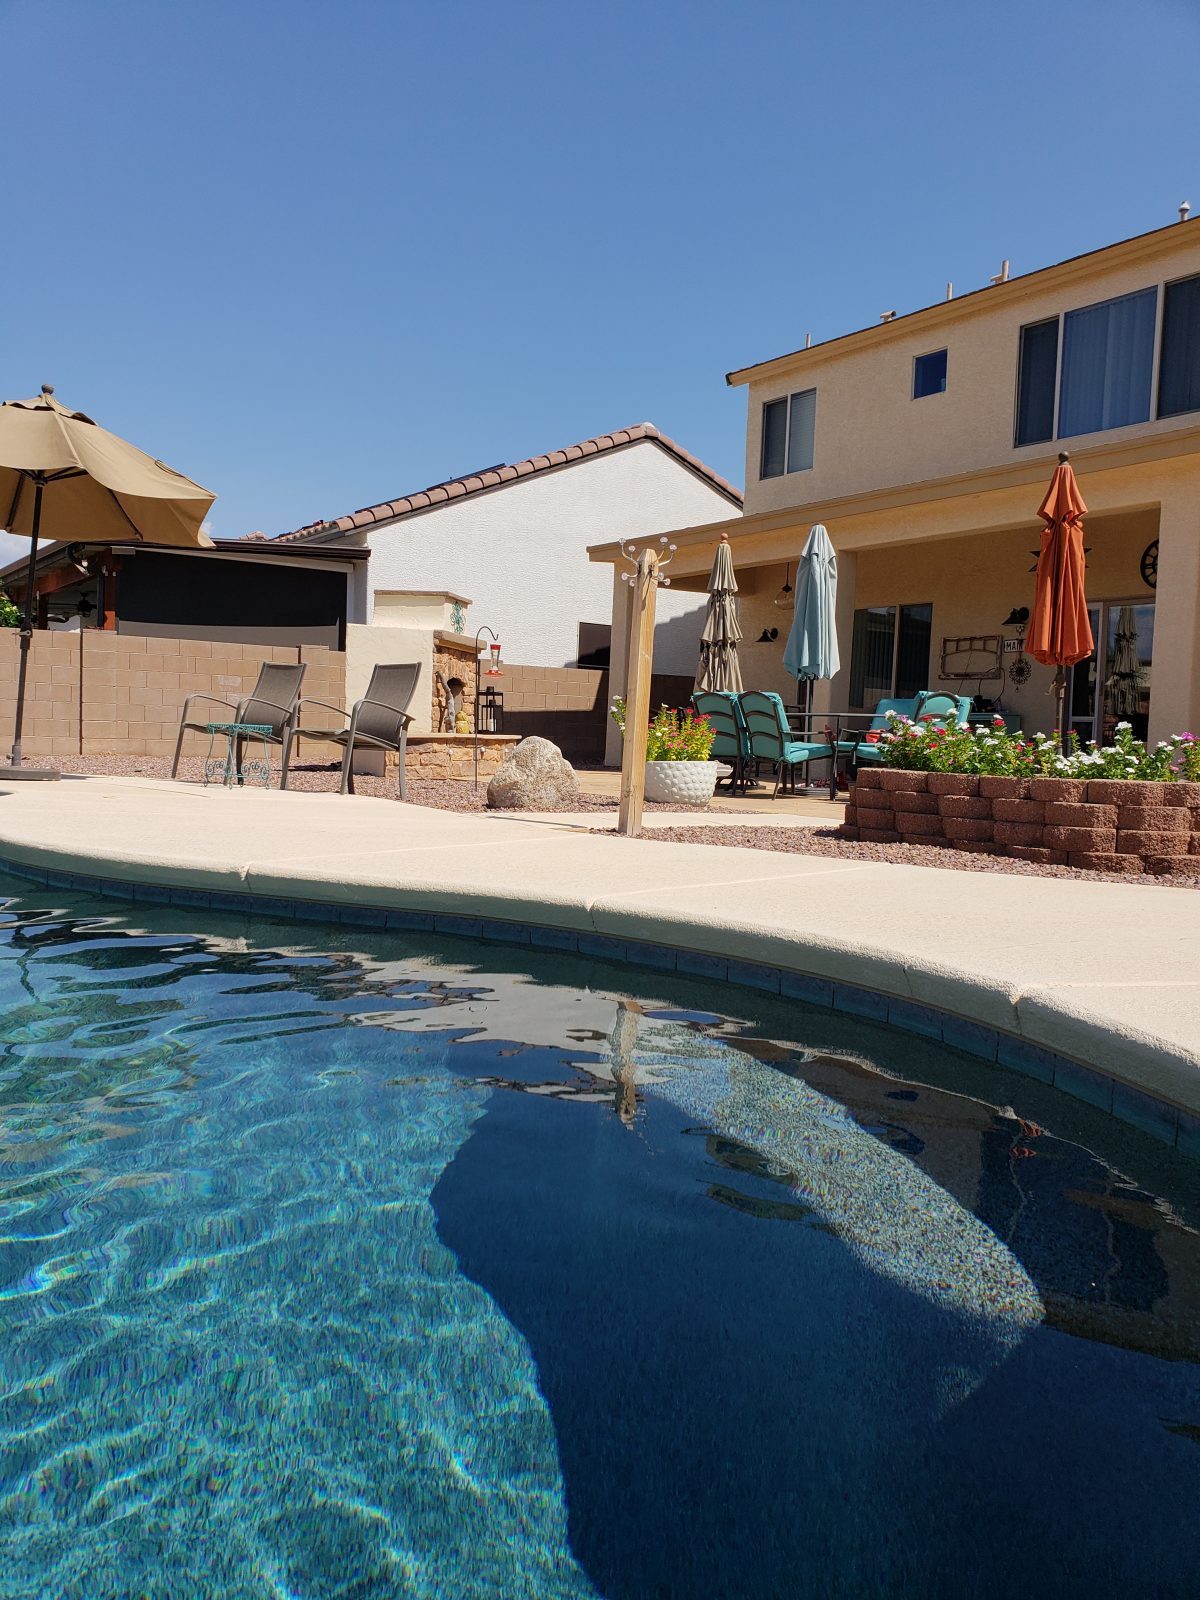
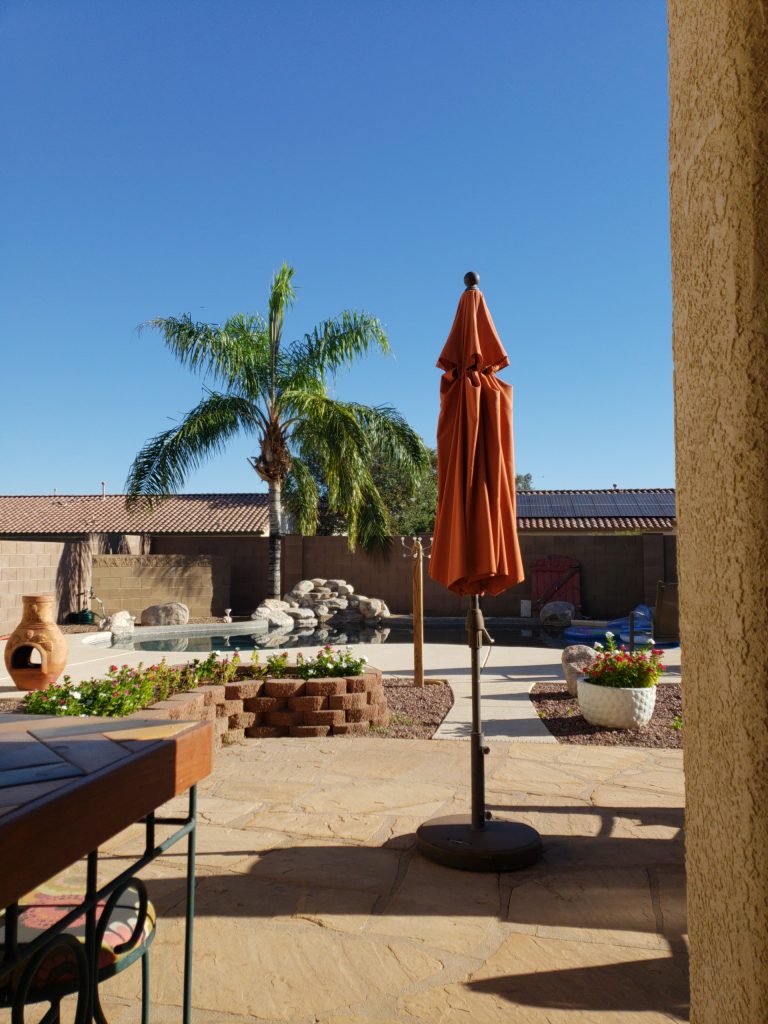
Years ago it took a lot of thought to build our backyard and with the numerous layout possibilities, we had to pick what we liked. The pool was first and because it was the biggest feature, it took up the first big chunk. Then we built our outdoor fireplace and outdoor kitchen. They went on opposite sides of the large flagstone patio, which framed the backyard area closer to the house.
Pool went in first due to its size
The outdoor kitchen framed one side of the flagstone patio
We enjoyed the layout for many years but we started to get a little bored with it. My wife and I started talking about a backyard refresh. This will not be a small endeavor as most of the backyard will be altered.
The fireplace framed one side of the flagstone patio nearer the house
But we are going to be doing the bulk of the work. Now, as a habitual DIYer and DIY business owner, I am not intimidated by the task. The only thing I will need to contract out will be some of the heavy lifting and trash services to haul away the old building materials. This will be the old pool decking, the old masonry that will be removed, and the flagstone patio that will be replaced with a more modern paver.
Are You Ready?
Maybe you’re in the same spot we are with regard to your backyard. Does your outdoor space need a redo, an upgrade, a refresh? It doesn’t have to be a daunting task, because we have DIY construction plans for your new outdoor fireplace and outdoor kitchen. DIY rocks can be your mantra too.
Even if you have never built with cinderblock and mortar, we can walk you through your build with step by step instructions and detailed diagrams. You will be able to follow the plans that will show you the exact placement of each and every block. There is no better way to build and you can classify yourself as a full-fledged DIYer. The BEST part is that you will save thousands of dollars if you do the work yourself.
We Are Here To Help
Don’t think you have what it takes? Go to our website, www.backyardflare.com and check out the gallery of outdoor fireplaces and outdoor kitchens built by Backyard Flare DIY customers. Anyone can do it with our help. Let us prove it to you.
We stand on what we design. We got you covered!
And if you need a bit more help, you can get our video tutorial series that will show you how to build an outdoor fireplace. We have strived to put together a whole package that a DIY homeowner can use to have outdoor building success. Why wait? Visit www.vimeo.com/ondemand/diyoutdoorfireplace today and watch our video trailer. We know you’ll be inspired to start your DIY project and we want to be a part of it.
Backyard Flare is second to none with customer service. You want to talk directly to someone about your project? Call Dan at 520-269-9740 now and discuss your project. Consults are free of charge. Never a better way to get started. We look forward to hearing from you.
As we always say, “DIY Rocks” and “Happy Building!!!!”
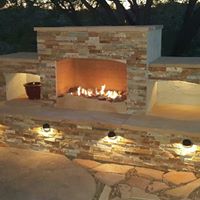
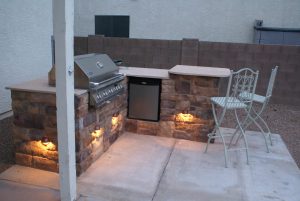
Lighting was added to the hearth and inside the storage voids.
Killin’ Time
The other day, I had to drop my car at the tire shop and because I had a few minutes to spare, I walked across the busy street to some stores. As always, I was drawn to one of my favorite stores, Lowe’s Home Improvement, and I found myself standing in the outdoor lighting aisle. If I go to Lowe’s, I almost always want to at least walk down some of my favorite aisles to see if there is anything new on the shelf. This day was no exception.
I should back up a bit and say that whenever I build any type of structure in a backyard, whether it is an outdoor fireplace or outdoor kitchen, I always look for ways to spice up the final look. One of the things that I have written on in the past is my love for outdoor lighting. It just makes a backyard, and specifically, outdoor structures, come alive at night. The shadows created and the way things look in the dark with some light are just awesome.
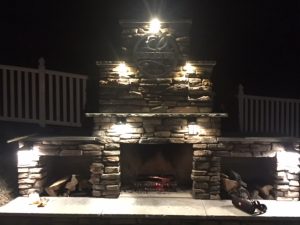
Lighting was added above the firebox.
So, back to Lowe’s and the outdoor lighting aisle… In the past, if I needed lighting, I have just gone to the store and picked up what I needed to complete the lighting project. I have never shared with my audience how inexpensive it really is to add this great feature to your DIY outdoor fireplace or outdoor kitchen. Well, wait no more. Here we go.
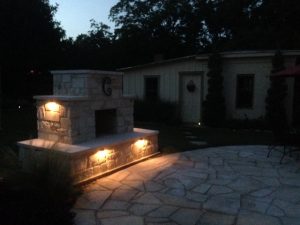
This DIYer added lighting to the hearth and the sides of the fireplace.
Outdoor Lighting Components Explained
With most outdoor lighting, there are three main components involved. They are a power source, otherwise known as a power transformer, wire, and the lights. The transformer is a heavy cube that plugs into an outlet. Many of these transformers will turn on at dusk with photo eye technology and you simply tell it through a setting, how long you want the lights to stay on from that point. Pretty cool!
Four lights were added to this curved hearth.
The neat part is the lights will come on automatically and shut off automatically; no work for you. They come in different wattage’s starting from around 60W to several hundred watts. For powering a structure, the smallest will be completely sufficient, especially if you’re using LEDs. A 60W transformer will sell for around $50.
The wire will hook into the transformer with screws and the wire will snake through your structure’s block work. We’ll get into the install in a different post. The wire will transfer (Direct Current – DC) low voltage as the transformer’s output to the lights, so it won’t shock you any more than holding on to a flashlight battery. It’s nothing like the power from an outlet in your house. A 50’ length of this outdoor lighting wire will cost around $20.
LED Lighting Is awesome
Lastly, the lights. Today’s technology has put LED lighting at the forefront for efficiency, longevity, and amazing power savings. LED stands for light emitting diode. An LED is a small electronic component (diode) that will glow when power is applied. No more changing incandescent bulbs, right? Can I get an amen on that one?
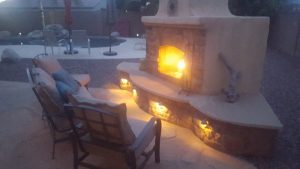
This Catalina fireplace had lighting added to the hearth for a great look.
LED lighting fixtures are sold individually, and they can run anywhere from a few dollars on clearance to around $20 for each fixture. I add at least two LED fixtures to any structure, so it is aesthetically pleasing. Two is really all you need for a structure width of only six to eight feet. The LED fixtures will have power cord on them. This cord will connect to the wire and the connectors will pierce the wire to be powered. The best part is that each LED is around 2W to 4W so you could hook up to 30 of these 2W LEDs to a 60W transformer. Do you see the math? This is turning into an electronics training course now.
This DIY Tucson Grill design had lighting added around it for a finished look.
How Cheap is It Really?
If you were to add two LED lighting fixtures to a fireplace, you would be able to spend as little as $110. Now that’s a bargain when you consider the look you’ll achieve. I hope this post helped you understand how simple outdoor lighting is and how inexpensive the components are. It’s really not that complicated.
Check out Backyard Flare, LLC to learn more about building your own DIY outdoor fireplace or outdoor kitchen and peruse our gallery for great ideas in design. See what other homeowners have done.
If you have any questions about anything, please let me know. I am always excited to hear from a fellow DIYer, or someone wanting to learn more about how to beautify their backyard space. I can be reached at dan@backyardflare.com and as I always say, “Happy Building”.
You have probably seen a lot of fireplaces built without mantels and with a clean front face to them above the firebox. Inversely, lots of fireplaces have been built with shelves, commonly referred to as a mantel, above the firebox. Either look is cool but I’ve always thought the mantel addition to the front of an outdoor fireplace was a neat touch. Hanging a fireplace mantel can be difficult depending on the type of material used. The most widely used mantel material is wood so we’ll cover that in this post.
What Now
So let’s assume you are done with your fireplace rough build, finished to a bare cinder block front face. You now have a drab gray block wall and you want to know how to hang the large four foot wide, railroad smelling, piece of dark beautiful wood as a mantel. That sure is a descriptive mouthful, but there is a bit of worry in the planning. The last thing you want is for the mantel to come down or appear to sag at all in the life of your fireplace.
We have an installation method for your heavy wood fireplace mantel, using pieces of steel. Have you ever paid attention the hinge side of a door in your house? If not, open one up. Look at the hinge and see how the edge of the door has been cut out in the shape of the hinge. This allows the hinge to be recessed into the door, allowing the smaller gaps when the door is closed.
Get Some Supplies
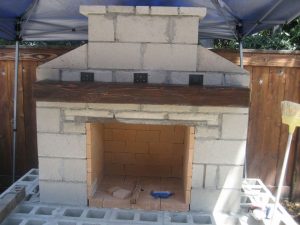
Large wooden mantel ready for install.
You can use that same technique when hanging a wood mantel to the front surface of the fireplace. You will need at least two or three pieces of 1/8” thick steel. These pieces of steel will be about 2”-3” wide and about 10”-12” long, depending on the size of your mantel obviously. You can use a chisel and hammer or a router and cutting bit for a faster method. Cut out the back of the wood from the top, equal to the width of the metal. As an example, if you have an 8” tall railroad tie, you will probably want to cut out at least 5”-6” down, assuming your piece of metal was about 10” long.
Metal brackets added to the back of the wood mantel.
This metal will be bolted to the wood with some pretty gnarly screws or bolts. Using a heavy threaded bolt will insure a good bite into the wood. You will drill holes in the metal and put a couple of bolts in the wood, per piece of metal. The metal will be pretty flush with the back of the wood and the head of the bolt may be a bit further out. No biggie.
Your mantel can now be held up by your favorite helpers or suspended with vertical wood pieces. Drill some more holes in the exposed section of metal above the wood and mark your holes on the cinder block. Drill into the block and add lags. These lags are like wall anchors in your drywall. They will expand when a bolt is screwed into them.
At the End
Wood mantel was added to the front of the DIY fireplace.
Once the mantel is in place, it may have a slight front tilt, but that’s okay for water runoff. You can shore up the underside of the wood with some shims to even it out if it is leaning too far forward. The veneer will be applied to the structure and directly over the metal that is holding the mantel in place. The mantel will appear to be floating and your guests will think you’re a genius for being able to complete such a feat.
We hope you can use this technique and that you’ll send us some pics of your install. Hanging a fireplace mantel doesn’t have to be a hard task, so we hope you’ll try to DIY the job. We’d love to see how it turned out for you and in your project so send pics. If you have any questions about hanging fireplace mantels or anything else about your outdoor fireplace, let us know. We can be reached at dan@backyardflare.com or at 520-269-9740. Check out www.backyardflare.com for great DIY fireplace inspiration. As always, happy building.
There are some great ways to finish your outdoor fireplace. Basically, there are endless of ways to add the finishing touches which will make your outdoor fireplace a one of a kind. Even if you build the basic rough structure that another person constructed, yours will look different.
If you pay attention to detail, your fireplace and backyard landscape can look like something in a magazine. We will cover five of the big finishing touches and things you can do to give your fireplace the wow factor.
1. Low voltage lighting
Even when the fireplace is not being used, low voltage lighting is a great way to add a great night time visual aspect to it. The lighting is powered by a transformer specifically designed for these types of lights. By connecting the fireplace lights to landscape lighting in your yard, everything will be illuminated at the same time.
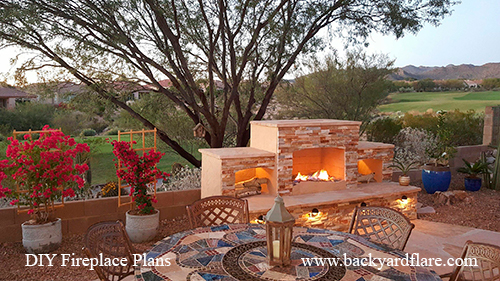
Lighting adds a great look to any fireplace
2. Natural stone seating surface
By using a natural stone material for the seating, you will have a very durable, and inexpensive surface. There are a couple widely used stone options, such as flagstone and bluestone. Both can be purchased at landscape supply retailers and you will have tons of colors and patterns to choose from. Cutting the stone is as simple as using a diamond blade for a smooth edge or a chisel and hammer for a rough rustic edge.
Natural stone was used for the seating surface, shelves, and top.
3. Stacked Stone Veneer
Stacked stone is a great way to finished the vertical surfaces of the fireplace, but it can be somewhat expensive as compared to other finish options. This type of material is purchased in arrangements that will fit together seamlessly. The stone is real and engineered during the cut process, meaning that it will be very easy to install. Cutting this stone will take a bit more time and patience as it is sometimes brittle.
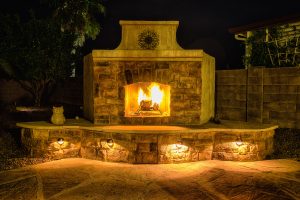
Stacked stone added to the fireplace hearth.
4 . Faux Veneer
Faux veneer is a fabulous way to add a cheaper finish to the outside of your fireplace than natural stone. The great thing about faux veneer is that you can find virtually any texture, color, shape, and size imaginable. The faux stone is basically a manmade product that is painted and finished to look just like a real material. The faux stone is very easy to cut but it may take a bit of extra time fitting it together. There is no “one way” to put it together most of the time, so using your Tetris skills will come in handy. Faux veneer will usually require corner pieces that will give you a great finished look as the material wraps from one vertical surface to another.
DIY built fireplace with faux veneer.
5. Wrought iron accents
Wrought iron accents will add both a décor and some functionality to your fireplace. First, add an elevated fire grate in your firebox. This will both give you a great look, but it will aid in keeping your burning wood elevated for proper air flow. Fireplace tools will give you the capability of working and stoking your fire as you need to. Many tools sets will come with a holder as well keeping it nice and neat.
Adding wrought iron definitely adds character.
Well there you go, five considerations that if done right, will set your fireplace on a pedestal. You don’t have to do them all to achieve a great look, but they certainly won’t hurt.
If you want to build your own outdoor fireplace, check out www.backyardflare.com for some great ideas and inspiration. We are sure you will get a vision for how you can transform your backyard into a great destination.
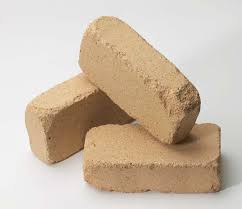
Firebrick is fairly simple to explain. There is no secret to it but there still seems to be a lot of questions about it. It is a necessary material in your fireplace and it is both functional and great looking.
How many customers have I spoken to asking what type of firebrick to purchase? Countless is the answer. How many customers have I spoken to asking where to buy the brick? Countless in the answer again. How many customers have I spoken to asking what to use to adhere them on heir structures? You guessed it…countless is the answer.
Firebrick, or refractory brick, is a ceramic material “brick” that is used to line the walls of an outdoor fireplace. The main job of the firebrick is to insulate the fireplace from the heat produced and to give you a nice-looking firebox.
Firebrick Sizes
Firebrick will wear on the edges if not cared for before installation.
Most of your vendors will have two basic sizes, 4.5x9x2.5 (full) and a 4.5x9x1.25 (split). Basically, the split is half the thickness of the full brick. The brick is very smooth to the touch and somewhat light weight even though they are solid bricks. They are machined very precise so they won’t vary very much on size. Most of the time they resemble a piece of sandstone, in that they wear down easily if rubbed on a hard surface like a cinder block.
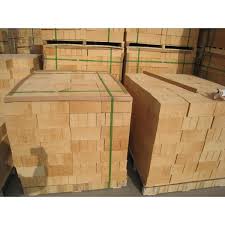
Most of your big box home improvement stores like Home Depot and Lowes will sell you firebrick but you’ll pay a premium as compared to the price you’ll pay at a small mom and pop masonry supply vendor. Get on the computer and search for “masonry supply” in your town or area. Call a few of them up and ask if they sell these specialized bricks and most of the time they’ll have a few pallets of them available at their yard.
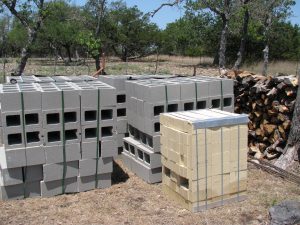
Pallets of firebrick can be found at many masonry supply stores.
Purchasing
Your geographical area will dictate the price for these little bricks. For instance, I can buy them here in Tucson, Arizona, for approximately $1.60 each, split or full. A customer once called me and said that they couldn’t find them for under $4.00 each. He was in the densely populated New England area so I got his zip code and did a few internet searches. My search resulted in phone calls to a few mom and pop vendors and I found a vendor who carried the split firebricks for $1.30 each.
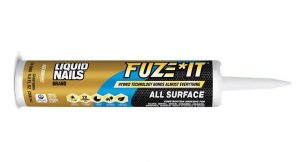
Liquid Nails – Fuze It is a great tool for adhering firebrick
The adhesion method I gravitate toward is high heat construction adhesive such as Fuze It by Liquid Nails. It hasn’t failed me for years and I’ve built many structures using it. This method is mainly for a firebrick install that does not have mortar gaps between them. Tight packing the bricks gives you a neat look to the firebox and it is less work as they are consistently the same size.
I hope this helps answer some of the firebrick questions. Visit us at www.backyardflare.com for more information on firebrick and the uses on our fireplaces. Thanks for reading.
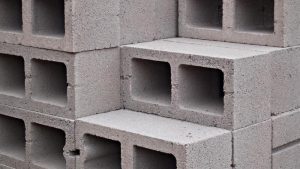
Building with cinder block is the most versatile way to construct both a functional structure and a structure with great strength and integrity. Cinder block, otherwise known as a concrete masonry unit (CMU), can be purchased at most home improvement stores such as Home Depot and Lowes. The prices for CMU at these big box home improvement stores are most of the time very comparable to local block vendors.
Close to Backyard Flare, LLC here in Tucson, Arizona, is a block manufacturer/vendor named AZ Block. At the same location where they manufacture the block, you can enter the facility to buy direct instead of dealing with a middleman. This at times can make the block more cost effective for the DIY builder.
Common 8x8x16 cinder block with voids. Great block for fantastic strength and structural integrity.
The most common block used to build the fireplaces is referred to as a 8x8x16. This is literally the size of the block in inches. Now there is a small “but…”” involved though. The block is not exactly 8x8x16. In fact, the block measures 7 5/8” x 7 5/8” x 15 5/8”. Notice that 3/8” is subtracted from each measurement. This is comparable to a 2×4 piece of wood not actually measuring 2” x 4”. They are actually 1 ½” x 3 ½”.